Friday, August 26, 2022

Shabby style Large Tag Card

 Hi, friends! 

Today, I'm sharing a shabby style tag shape card featuring SSS Etched Laurel leaves die and Gina K Summer Silhouettes stamp.  


These days, I've been self teaching on various mediums and new ink colors to get used to them after a long break from crafting, so all th elements on today's card are kind of my practice outcomes so far. To follow the challenges themes (described at the end of this post), I decided to use all of them. 


Top panel : I die cut a piece of bristol paper using a small Postage Stamp Edge Die, masked off all four borders, ink blended the inner space using distress inks : evergreen bough, salvaged patina, tattered rose, saltwater taffy, crackling campire. You don't have to use such many colors to inke blend this small piece at all! I think just blue & coral inks would be enough. However, as I wrote above, this was a testing of a new-to-me colors, so I used all of them. After inking and water splatter was done, I stamped silhouette images from Gina K Summer Silhouettes using Versafine Onyx Black ink & MISTI. 


Bottom large tag panel : I colored a piece of watercolor paper with distress oxide inks uncharted mariner, weathered wood, and tea dye. Then I added watered-down white gouache with a flat brush. After it dried I cut the panel into A2 sized stitched large tag using a large tag die from Avery Elle (2015). To add more texture mimicking a shabby fence look, I scratched down several lines vertically using a craft knife. 


Laurel Leaves  : I used four different ways. 

(1) Gray blue & coral leaves on the Rt upper corner : Ink blend a piece of watercolor paper with distress ink speckled egg, weathered wood, and a pink dye ink.  Dry embossed using any embossing folder.  Add shinning textures with two Mica Sprays : Wendy Vecchi Cornflower Blue & Tim Holtz Antiqued Bronze. Cut the panel with SSS Etched Laurel leaves die. 


(2) Brown leaves on the Lt lower corner : ink blend a piece of dry embossed (Acorns 3D Texture) Woodgrain Kraft cardstock with orange & olive green inks, add shines with Mica sprays. After drying, cut with SSS Etched Laurel leaves die.


(3) blue & pink leaves on the Lt upper corner : inkblend watercolor paper with pink/blue/green distress inks, add watered-down gouache brushing, add Mica sprays, then die cut. 


(4) Gold leaves on the Rt lower corner : die cut clean watercolor paper and directly add sprays onto the cuts. 


I also made transparent leaves by die-cutting a piece of thick vellum paper. 


[ To compose a card ]

I layered the panels leaves using glue and thin foam tapes. I then splattered with white gouache a lot to give a wintery mood. For an embelishment, I added a small double ribbon bow, a gemstone and several jewels. 


For a cardbase, I made A2 rectangle card base first, then die cut it with the same large tag die using a partial diecutting technique so that the left border of the card base was spared. 


For the sentiment, I went simple with a premade sentiment block from Tim Holtz Idea-ology Sentiments Label Sticker

That's it for today. Hope you enjoyed my card. 


I'm entering this card to the current challenges listed below:
Simon Says Stamp IG Challenge : Layer It

Thank you for reading today's post.
Have a great day!

Marge


Tuesday, August 23, 2022

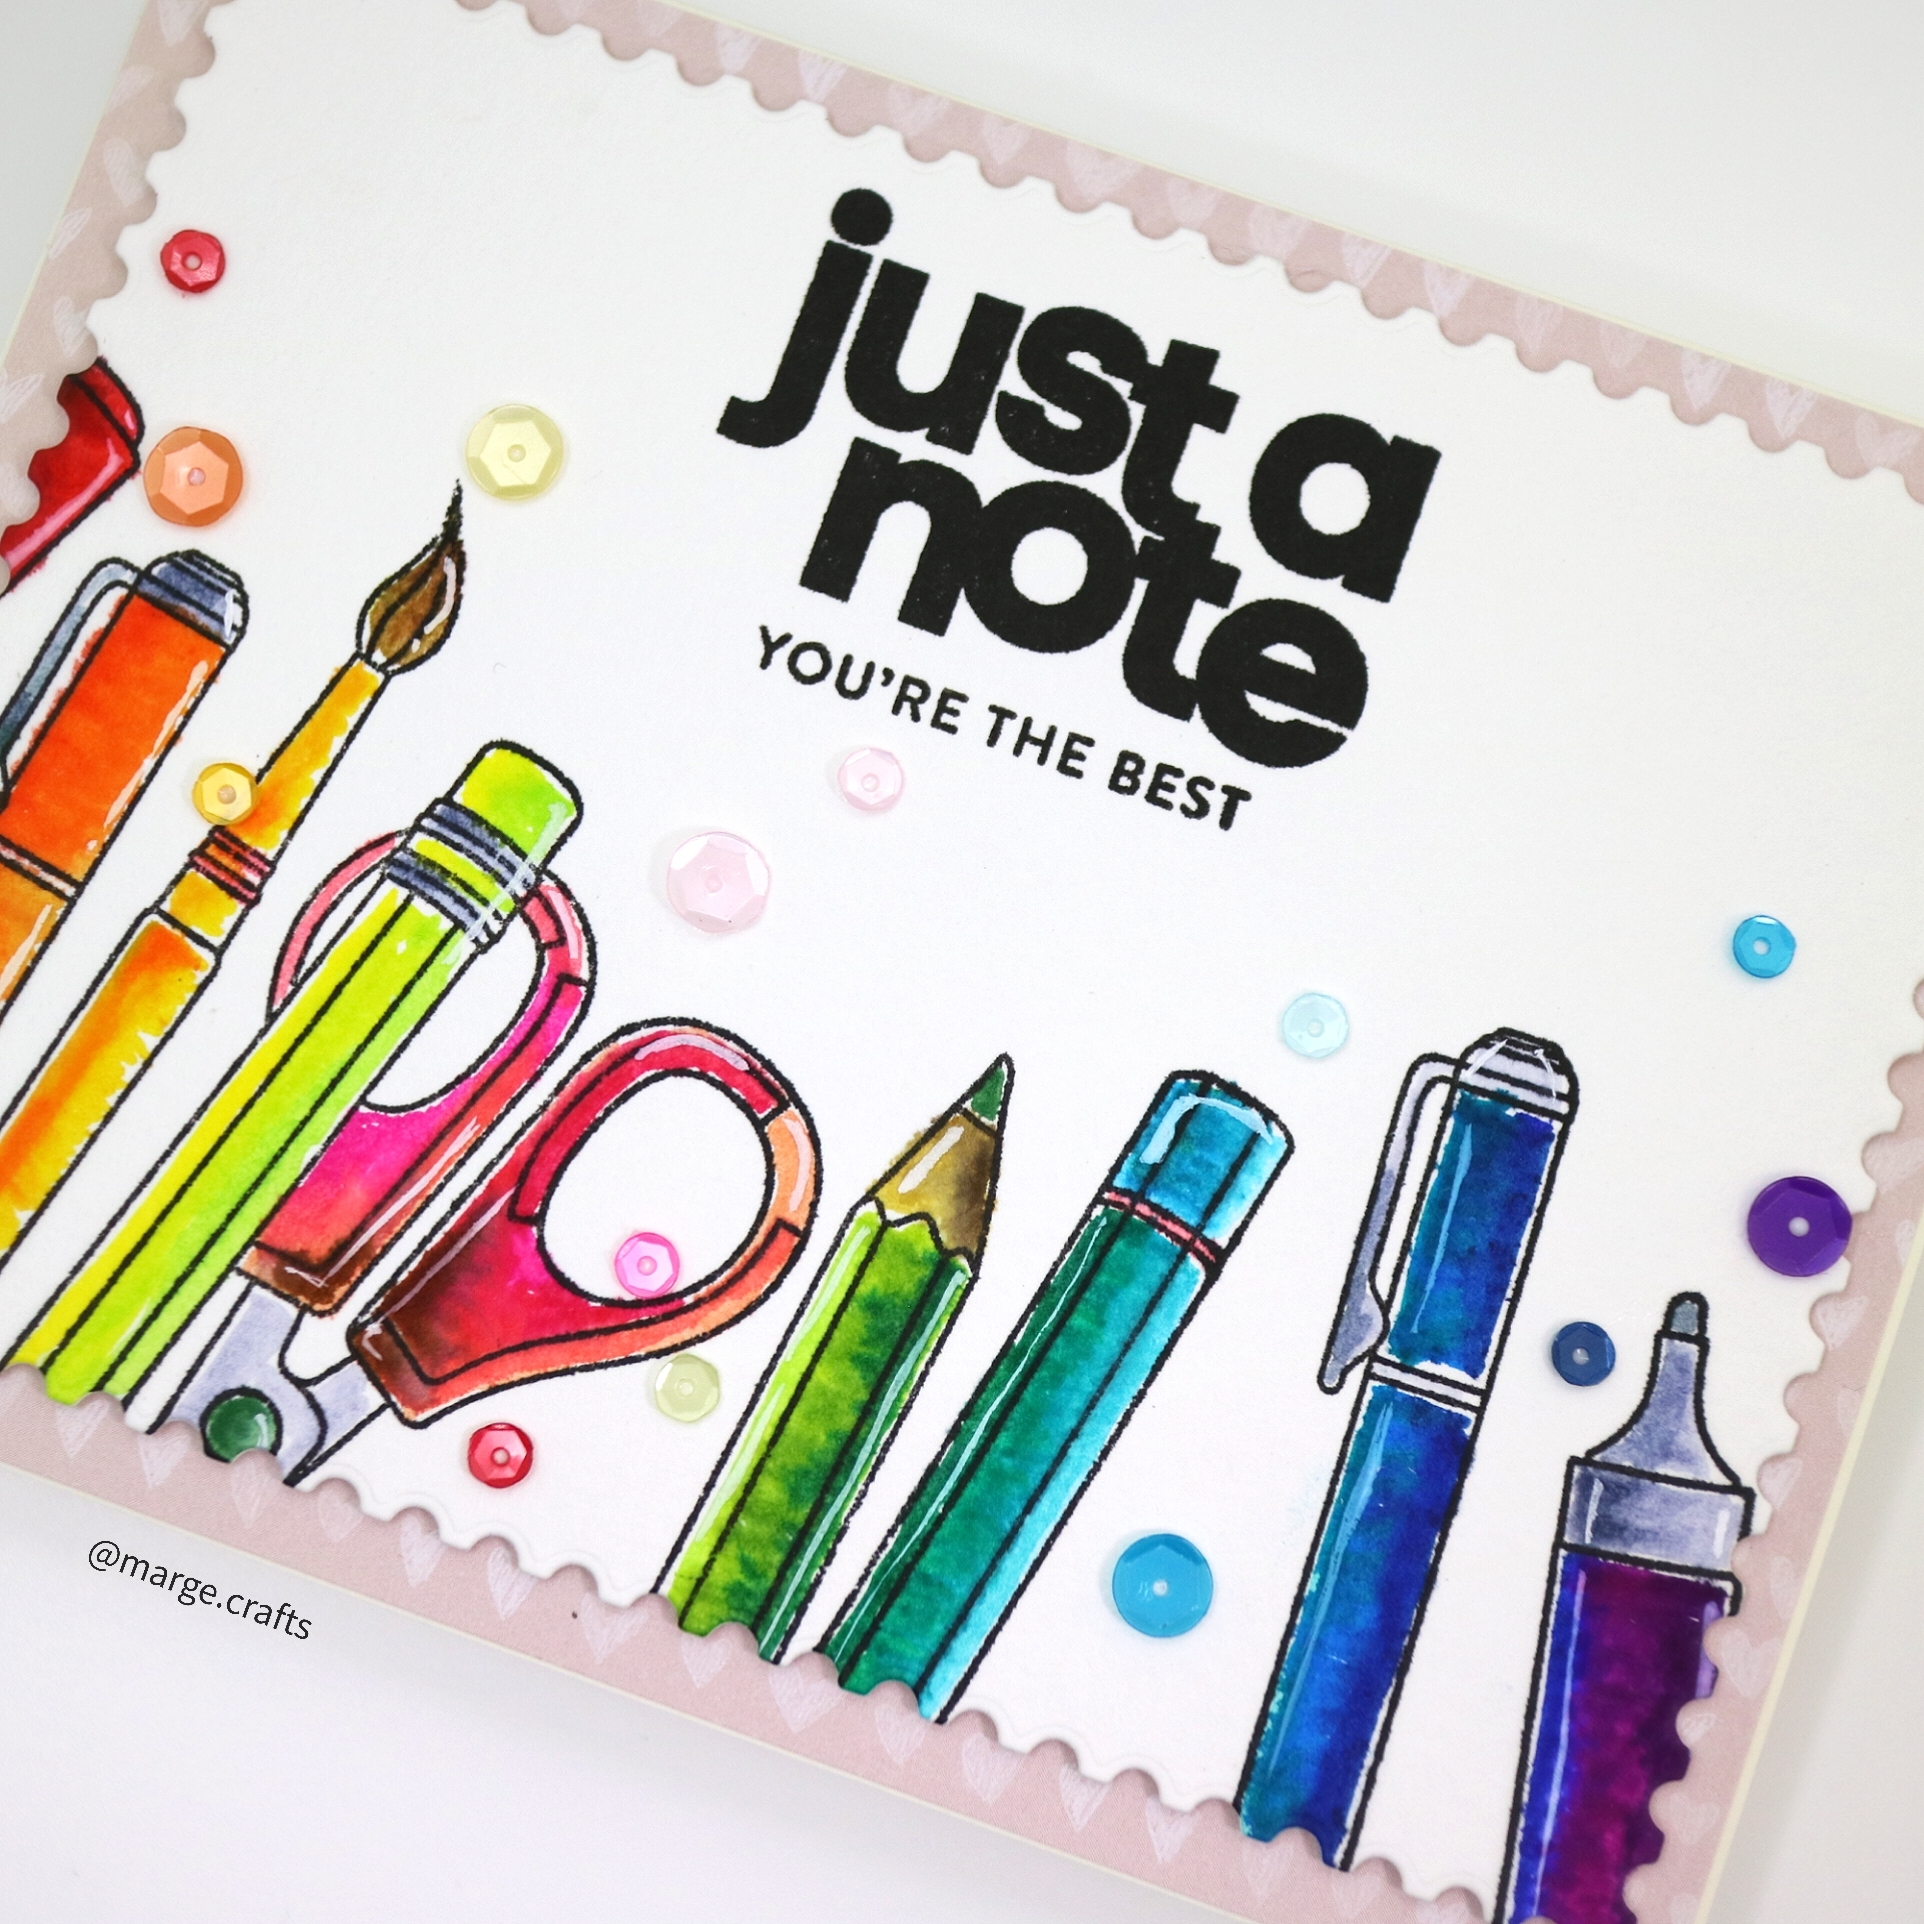
SSS Take Note Watercolor card


Hi, friends!

Hoping that Back To School theme card is not so late, I made this card featuring SSS Take Note Stamp set. I wanted to test my Karin Brushmarker Pro set which is composed of 60 colors and rainbow-coloring was a perfect way to try variety of colors of a set.


I trimmed a heavy-weight watercolor paper into A2 size panel, stamped images from SSS Take Note using Versafine Onyx Black ink, then I colored in the images with Karin Brushmarker.


After coloring was done, I added white gel pen details, stamped sentiment on the top of the panel, then die cut it with Postage Stamp Edge Frame Die. I foam mounted my panel onto a piece of pink colored pattern paper, and adhered them onto a card base. As finishing touch, I added rainbow colored sequins around the images. 


 Karin Brushmarker Pro has such pretty colors in it and most colors are very bright and highly saturated as you can see in my card. I think it's very unique and fun watercoloring medium as well. If you're interested more in it, I had shared another card using the set years ago, so check it out here
However, they were very prone to bleed, so you need to be careful to use small amount of ink for each coloring. Here's a closer look at it.  


Besides, some colors were not matching the index colors of each cap, which made me confused. Preparing a color chart seemed necessary. I also had to move quickly to blend and mix different colors because they dried soon once painted. I think I'll get better results if I'm experienced to this medium, use blenders in the set other than usual water-brush, paint less amount of ink, and practice more. 


That's it for today. Thank you so much for stopping by!

Have a great day.

Marge


Monday, August 22, 2022

One layer watercolor floral card


Hi, friends!

Today, I'm sharing a watercolor floral card made with one-layer design. I had bought this Sketched Roses Stamp set a couple years ago, but , somehow I had missed purchasing coordinating die set . Without a coordinating die, I decided to go with one-layer design this time. 


I started with trimming water color paper into A2 size and then I stamped the rose bouquet on the two corners in diagonal direction using Distress ink Tea Dye.  I love Tea Dye ink for stamping when I watercolor flowers. There's something soft and elegant in the color of Tea Dye so you can get some tender mood in your paintings and you can also get the clear outlines compared to no-line water-coloring, which makes your coloring a lot easier. 


After stamping, I colored in the images using Altnew's watercolor 36 pan. I love Altenew's inks so much because they have really pretty colors in them. Although the 36 pan set is not an artist level quality, it surely has beautiful colors and watercoloring using it is not that difficult, so I chose it for today's medium. I also bought 24 pan Artist level paints recently, which I'm planning to use for my future project. 


I used 6 colors from the 36 pan set to color the images and I didn't give much attention when coloring. It was just easy going and relaxing water color process. After I finished coloring, I stamped sentiment from the same set on the center of the panel, using Versafine Onyx Black Ink. 


I really loved how this one layer look like something transparent!
I foam mounted the panel onto a card base, and embellished it with some sparkling sequins. 


I also made a REEL of making this card, so if you're interested in it, please check my IG account at @marge.crafts on you IG app. Or, you can watch it on the widget on the left column of this blog if you're reading this post on your PC or a desktop mode. 


Thank you for stopping by.

Have a great day!

Marge 

Saturday, August 20, 2022

Autumn Wreath Cards with Watercolor Backgrounds


Hi, friends!
Today, I've got two cards using the same wreath stamps set but with different color palettes to share with you.


For today's cards I used products from The Greetery, which had been sleepling in my stash for years. I was happy to finally play with my unused supplies! 

I started with stamping the Bountiful Wreath on the Bountiful Wreath die-cuts using Altenew's dye inks. 


For the background, I trimmed Cold press watercolor paper into A2 size and then watercolored the center lightly using a wet in wet technique. 


After the panels were dried up, I cut them with Crimped Frame Die. I then positioned wreath cuts on the panels to guide stamping sentiments through the wreath holes. After sentiments were stamped, I put the wreath cuts aside, splattered with black and gold inks over the panels and let them dry. 


For the first card, I chose pink & yellow background for the mint-leafy wreath. I adhered the wreath using foam adhesives and added ivory twine ribon on the left upper part of the wreath. 


Once the wreath was adhered, I added white gel pen details onto the images.


For a soft look, I chose Cream colored cardbase. By adding 3mm sparkling sequins around the wreath, I finished it. 


Now, the remained green panel and red leafy wreath were combined for the second card. 


The steps were almost the same with the first card except that I used clear drops instead of sequins as I just wanted to give a little changes. 


The soft colored watercolor background and bright colored stamped images seem to go well together, right ? I could feel very relaxed while doing this simple watercoloring, and I love the final outcomes. Hope you'll like them, too.


That's it for today! 
Thanks so much for stopping by.
Have a great weekend!

Marge 


Thursday, August 18, 2022

Trying Gradient Watercoloring on Embossed Panels

 Hi, friends! 

Today, I have two cards which are outcome of my experiment of gradient watercoloring on dry embossed panels. 


I wondered how it would look like if I watercolor embossed panel. So I embossed heavy weight watercolor paper using Picnic Floral embossing folder and colored it the same way I shared yesterday, with my Danial Smith paints. So here's the outcome. What do you think of it?


Well.....my concolusion was this experiment was a half success. It surely gave some interesting texture to the panel but there was a big problem that the watercolor paints did not evenly spread on the paper due to irregular surface. As a result, you can see the gradiation borders are not clean and the shades in each color block are not even. If I had not intended clear lines between each color block I would have gotten better results. 


Here's my second card for which I used DS Undersea Green. 


 I loved the deep green color of Undersea Green. But watercoloring was tricker with this ink (I don't know the reason, I might have failed to control water concentration, lols), so I trimmed all the four borders by diecutting it with Antique Frame Die, and gave it a Christmas mood .


I'm in love with how the deep green, gold and white colors go very well together!


Products List :  Picnic Floral embossing folder .  Happy Birthday Brush Script die , Wreath Tag die (retired product), Rejoice Shadow dieCZ Deer In a Row DieGansai Tambi Starry Colors SetAntique Frame DieSSS Cardstock Cream Off WhiteSSS White Glitter paper, Vellum paper, snowflake diecuts, and PPP Jewels.  


Thank you for stopping by! 
I'm entering the green card into the current SSS Wednesday Challenge where the theme is Christmas. 

Have a great day.

Marge 


Wednesday, August 17, 2022

Gradient Watercolor Background Card


Hi, all! 

Today, I did a fun watercolor experiment, which was making a gradient watercolor background. 

I had wanted to do it for so long, but hadn't had a free time to do. So I was very happy to finally be able to do some watercolor works. 


First, I pulled out Arches cold press watercolor paper and started with light watercoloring on the top of the panel. I let it dry, then I colored the lower part with the same watercolor paint but giving more pigment by controlling water amount. I repeated the process.


 Once the gradient watercolor panel was finished, I die cut it using Antique Frame by Penny Black and set it aside. Next, I watercolored a floral image from Dear Friend Stamp, die cut it using Dear Friend Coordinating die.


  I also made more diecuts from Believe It and Berry Branch for today's card and then I splattered with white and gold metallic inks over the panel and diecuts. The finished panel with all the diecuts and twine was foam mounted on a card base.


 Watercolor inks I used for today's card are Ultra turquoise(panel), New Gamboge, Quinacridone Sienna, Sap Green (flower) from Daniel Smith. 


That's it for today. 

Thanks for stopping by! 

Have a great day.


Marge


Monday, August 15, 2022

Fall Folliage Cards and Tags


Hi, friends!

I had already shared these projects on my IG account, but have been kind of lazy to write a blog post for them, lols. I love coloring on die-cuts so much because it gives the diecuts more shades than just using colored cardstock, and you don't have to mind outlines when you color, so it is really fast and easy! 


When I first saw the Fall Foliage Dies and Birthday Circles Dies, they were so adorable that I had to pick them. I made shaker tags using Birthday Circles Dies, and various sequins and beeds. The background was colored using green and orange dye inks from MFT (Safety Orange, Orange Fizz, Daffodil, Timber Green, Jellybean Green, Limelight) and splattered with water. I die cut Fall Foliage from white cardstock and craft cardstock , then I colored them using copic markers


I used YG99~YG93, E09/YR27/YR24, BG78/BG75/BG72/BG70 and other colors that I don't remember exactly in most foliages.  I really love the mushrooms and acorn!! They are so cute, aren't they?  


Using the Fall Foliage dies, I made two cards. I just colored lots of die cuts using my copic markers, and made bouquets which were centered in the cards. 


The baseket die is from IO stamps. 
Here are more closer look. 

[ Card 1]


[ Card 2 ]


Additional Copic colors, I used E47~E42 for brown foliage, and BG99~BG93 for dark green. 


That's it for today. 
I shared a REEL of making the shaker tags on my Instragram account. If you're interested in it, please check it out at the IG widget on the left column. 

Thank you for stopping by!

Marge