Showing posts with label The Greetery. Show all posts

Monday, August 22, 2022

One layer watercolor floral card


Hi, friends!

Today, I'm sharing a watercolor floral card made with one-layer design. I had bought this Sketched Roses Stamp set a couple years ago, but , somehow I had missed purchasing coordinating die set . Without a coordinating die, I decided to go with one-layer design this time. 


I started with trimming water color paper into A2 size and then I stamped the rose bouquet on the two corners in diagonal direction using Distress ink Tea Dye.  I love Tea Dye ink for stamping when I watercolor flowers. There's something soft and elegant in the color of Tea Dye so you can get some tender mood in your paintings and you can also get the clear outlines compared to no-line water-coloring, which makes your coloring a lot easier. 


After stamping, I colored in the images using Altnew's watercolor 36 pan. I love Altenew's inks so much because they have really pretty colors in them. Although the 36 pan set is not an artist level quality, it surely has beautiful colors and watercoloring using it is not that difficult, so I chose it for today's medium. I also bought 24 pan Artist level paints recently, which I'm planning to use for my future project. 


I used 6 colors from the 36 pan set to color the images and I didn't give much attention when coloring. It was just easy going and relaxing water color process. After I finished coloring, I stamped sentiment from the same set on the center of the panel, using Versafine Onyx Black Ink. 


I really loved how this one layer look like something transparent!
I foam mounted the panel onto a card base, and embellished it with some sparkling sequins. 


I also made a REEL of making this card, so if you're interested in it, please check my IG account at @marge.crafts on you IG app. Or, you can watch it on the widget on the left column of this blog if you're reading this post on your PC or a desktop mode. 


Thank you for stopping by.

Have a great day!

Marge 

Saturday, August 20, 2022

Autumn Wreath Cards with Watercolor Backgrounds


Hi, friends!
Today, I've got two cards using the same wreath stamps set but with different color palettes to share with you.


For today's cards I used products from The Greetery, which had been sleepling in my stash for years. I was happy to finally play with my unused supplies! 

I started with stamping the Bountiful Wreath on the Bountiful Wreath die-cuts using Altenew's dye inks. 


For the background, I trimmed Cold press watercolor paper into A2 size and then watercolored the center lightly using a wet in wet technique. 


After the panels were dried up, I cut them with Crimped Frame Die. I then positioned wreath cuts on the panels to guide stamping sentiments through the wreath holes. After sentiments were stamped, I put the wreath cuts aside, splattered with black and gold inks over the panels and let them dry. 


For the first card, I chose pink & yellow background for the mint-leafy wreath. I adhered the wreath using foam adhesives and added ivory twine ribon on the left upper part of the wreath. 


Once the wreath was adhered, I added white gel pen details onto the images.


For a soft look, I chose Cream colored cardbase. By adding 3mm sparkling sequins around the wreath, I finished it. 


Now, the remained green panel and red leafy wreath were combined for the second card. 


The steps were almost the same with the first card except that I used clear drops instead of sequins as I just wanted to give a little changes. 


The soft colored watercolor background and bright colored stamped images seem to go well together, right ? I could feel very relaxed while doing this simple watercoloring, and I love the final outcomes. Hope you'll like them, too.


That's it for today! 
Thanks so much for stopping by.
Have a great weekend!

Marge 


Friday, July 15, 2022

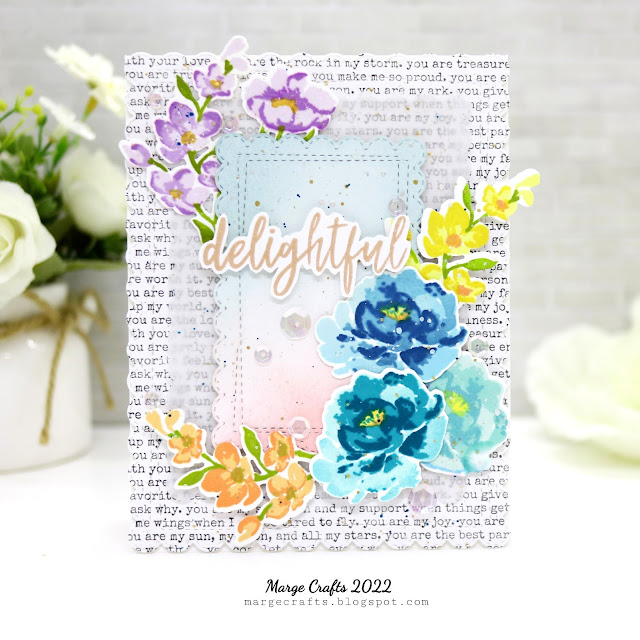
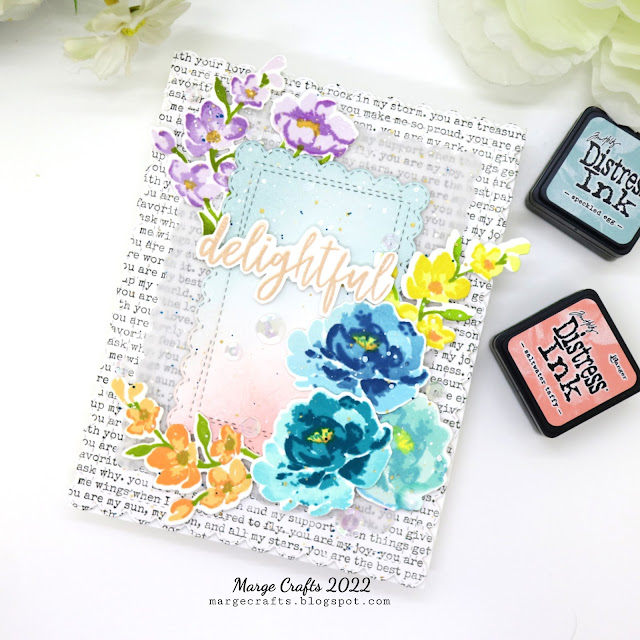
A Floral Card with Layers Scalloped Rectangles

Hello, friends!
Today, I'm sharing a floral card with a custom background to join the current Simon Says Stamp Wednesday Challenge, where the theme is "Make Your Own Background". Plus, I'm also entering this card to the current Simon Says Stamp Monday Challenge with the theme "Fabulous Florals". 


As I said in my previous post, these stamped background and floral images had been made years ago and been kept in my stash for years. 


For the bottom background,  "You Are" cling stamp were used, which was I diecut it using Wrapped Scalloped Rectangles from Memorybox. Using the same set  I cut vellum and white paper in smaller size to place them on the background layer by layer. Before applyingit, the smallest white diecut was ink blended with Distress Ink Speckled egg and Saltwater taffy


Next, I composed floral bouquets around the scalloped panels using the stamped images from Fleur Impressions Set by The Greetery.


I added some splatters of blue, white, and gold all over the panel, then I foam mounted "Delightful" which was heat embossed in pink gold. 


After I foam mounted the finished panel onto a cardbase, I added beautiful iridescent sequins for embellishment. 


 It didn't take much time for me to finish the card as all the stamped pieces had been made while ago. Thank you for joining me, today. 

Happy Saturday! 

Sunday, June 30, 2019

Window card with a floral bouquet


Hi, friends! I'm back with another card featuring the Fleur Impressions set by The Greetery. I just loved this set so much that I couldn't stop stamping it again and again. After I finished yesterday's card, I wasn't satisfied with the warm color palette as it is already summer, so I decided to go with some cool summer vibes.


I started by stamping Fleur Impressions set using various tones of blue dye inks (Sweet Dreams, Sumer Night, Deep Blue Sea) and I cut them all using the coordinating dies


I made a blue water-colored panel with gradation using Altenew watercolor brush marker Turquoise, and when it was dry, I cut it to a window panel using Avery Elle Scalloped Mat Die. 


I then stamped sentiments from Thinking of You on a white card base with the guide of the oval window of the diecut panel using my mini-MISTI. 
Then I foam mounted window panel onto the stamped card base. 


I adhered my floral images around the lower edges of the oval window as shown in pictures and finished off the card by adding some sequins. 


Thanks for your stopping by!
Have a great day. 
Marge ♡

Saturday, June 29, 2019

Floral scene card

Hi, friends!
I had fun making a floral scene card using a layering flower stamp set from The Greetery, which is called Fleur Impressions. 


I stamped the images layer by layer using my Altenew dye inks. Main colors I used are Tea Party setPocketful of Sunshine set, and Tropical Forest set. I then cut them all using Fleur Impression Dies.


For the background, I used distress oxide Worn Lipstick and Twisted Citron, then I cut my panel with Wrapped Scalloped Rectangles die.


I splattered with Metallic Accents over the panel and then I stamped sentiments from Thinking of You. All the blossoms and leaves were adhered using Glue dots and foam tapes. 


Finally, I rounded Ivory Twine on the top and embellished my card using Sparkling Clear Sequins Mix and 3mm Sparkling Sequins
I really love the pastoral mood from this Fleur Impressions set


Thank you for reading this post. I hope you enjoyed it. Have a great weekend!
Marge ♡