Sunday, June 30, 2019

Window card with a floral bouquet


Hi, friends! I'm back with another card featuring the Fleur Impressions set by The Greetery. I just loved this set so much that I couldn't stop stamping it again and again. After I finished yesterday's card, I wasn't satisfied with the warm color palette as it is already summer, so I decided to go with some cool summer vibes.


I started by stamping Fleur Impressions set using various tones of blue dye inks (Sweet Dreams, Sumer Night, Deep Blue Sea) and I cut them all using the coordinating dies


I made a blue water-colored panel with gradation using Altenew watercolor brush marker Turquoise, and when it was dry, I cut it to a window panel using Avery Elle Scalloped Mat Die. 


I then stamped sentiments from Thinking of You on a white card base with the guide of the oval window of the diecut panel using my mini-MISTI. 
Then I foam mounted window panel onto the stamped card base. 


I adhered my floral images around the lower edges of the oval window as shown in pictures and finished off the card by adding some sequins. 


Thanks for your stopping by!
Have a great day. 
Marge ♡

Saturday, June 29, 2019

Floral scene card

Hi, friends!
I had fun making a floral scene card using a layering flower stamp set from The Greetery, which is called Fleur Impressions. 


I stamped the images layer by layer using my Altenew dye inks. Main colors I used are Tea Party setPocketful of Sunshine set, and Tropical Forest set. I then cut them all using Fleur Impression Dies.


For the background, I used distress oxide Worn Lipstick and Twisted Citron, then I cut my panel with Wrapped Scalloped Rectangles die.


I splattered with Metallic Accents over the panel and then I stamped sentiments from Thinking of You. All the blossoms and leaves were adhered using Glue dots and foam tapes. 


Finally, I rounded Ivory Twine on the top and embellished my card using Sparkling Clear Sequins Mix and 3mm Sparkling Sequins
I really love the pastoral mood from this Fleur Impressions set


Thank you for reading this post. I hope you enjoyed it. Have a great weekend!
Marge ♡


Thursday, June 27, 2019

SSS Anchor Tag Shaker card


Hi, friends! 
Today, I'm sharing a simple card featuring Simon's Anchor Tag Die, which I finally got on my hands. This die set is one of my favorites among the new Rest and Refresh Release! 


First, I diecut Anchor Tag Die from watetcolor paper. Then, I colored the anchor in red, added gray stripes to the tag. 


I put a red eyelet into the tag hole using my eyelet punch, and added natural twine. 
In order to add a little bit of sparkles, I made the tag into shaker where I put 3mm sparkling clear sequins


Two layers of colored paper are from pattern paper sets(Country Garden by BoBunny, Beach Shack by Kaiser Craft), and I added more blue shades with teal colored dye inks and tanned effect with Tea Dye ink. I also distressed the edges just uisng my knife. 
I then splattered with gold and white metallic ink onto the panels.


I used foam tapes when I adhered each element to give my card dimensional look. 

Below the anchor tag is "hold on" script die cut from Words of Hope

I finished off my card by adding Sparkling Clear Sequins Mix and 3mm Sparkling Clear Sequins


I'm entering this into the current Simon Says Stamp Wednesday Challenge Anything Goes.

Thanks for looking!
Marge♡


Tuesday, June 25, 2019

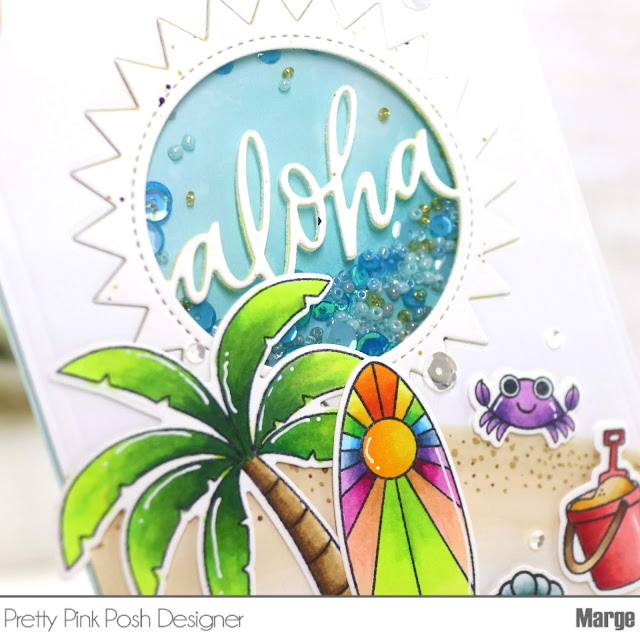
Pretty Pink Posh Summer Theme Card 1- Aloha Shaker


Hi, friends! 
Today, I'm kicking off my own summer theme projects featuring Pretty Pink Posh products on a weekly basis for the upcoming four weeks. Hope you'll enjoy my projects a lot. Now, here's my first one: Aloha Shaker Card


I had colored a lot of PPP summer themed stamps including Summer Surfboards, Summer Friends, and Sea Friends, which I already shared on my Instagram account and IG story. 


Can you spy my future designs from this arrangement? :) 


Coloring Summer Friends was so fun!


Now, let's take a look at my card for today. 
I diecut Aloha Shaker Die from thick watercolor paper twice, glued them together, and set them aside. 

For the front panel, I prepared a piece of A2 size bristol paper, then I draw sand beach with my Copic markers: E31-E30-E50-E57-E55. I also scored double lines around the panel using my scoring board to give it some visual interests. 


For the shaker background, I ink blended another piece of bristol paper with DO Broken China and Mermaid Lagoon. After I assembled my shaker, I adhered colored images to create a beach scene. As a final embellishment, I adhered Sparkling Clear Sequins Mix and 3mm Sparkling Clear sequins.


Thanks for looking and I hope you'll have a great day!

Marge


Tuesday, June 18, 2019

Altenew June 2019 Stand alone Dies Release Blog Hop + Giveaway


Hi, everyone!
I'm so excited to join Altenew's June 2019 Stand alone Dies Blog Hop, today. If you've come from Lydia 's blog then you are on the right track, or you can start your hop at the Altenew's Blog. I'm going to share two cards featuring Dainty Blooms Cover Die, Nesting Labels Die, and Star Flower Pop Up Die Set. You can see the whole release HERE.

< Card 1 >

This card was made with in-lay diecutting technique with water-coloring.


I started by diecutting Dainty Blooms Cover Die, from heavyweight watercolor paper. Because the paper was thick enough, the diecut pieces didn't get out of the frame even though they were cut perfectly. You can also add a piece of thin paper on the back of the panel in order to hold the pieces together when you do diecutting, which always works for me. I put the whole block onto my desk, fixed it with washi tape (as shown in the picture below), and then I watercolored each piece using Altenew Watercolor Brush Markers


You don't have to care about borderlines as you will pick only the negative pieces and the frame will be discarded after coloring. Next, I diecut Dainty Blooms Cover Die again from the same heavyweight watercolor paper, removed all the inner pieces from the frame, and adhered it onto a card base using double-sided adhesive tapes as shown in the picture (Oh, I found that using Stick It Adhesive Sheet was more convenient than tapes in in-lay diecutting, later) 


In turn, I in-laid my colored inner pieces into the new frame one by one using a pair of tweezers. You can see my progress in the next photo. The whole process from loose water-coloring to in-laying was so fun and it didn't take much time.


After I finished my panel, I diecut Nesting Labels Die from the same watercolor paper, then I stamped sentiments from Sincere Greetings Set, and foam mounted the label on the center. 


I embellished my card using Sparkling Clear Sequins Mix and 3mm Sparkling Clear Sequins


< Card 2 >

Card 2 features Star Flower Pop Up Die Set from the new release. I simply diecut a piece of Neenah White paper using Star Flower Pop Up Die Set, with which you could do your own arrangement of flowers and leaves freely.


Next, I colored the pieces carefully with my copic markers, then I stamped sentiments from Forever In Love Stamp Set on the bottom. 


As a final embellishment, I adhered Sparkling Clear Sequins Mix and Ballerina Pink Sequins.


That's it from me for today. Now, your next stop to hop along is Agnieszka Malyszek's blog. Thank you so much for visiting. 
Have a great day!

Marge

< Giveaway >

Prize 1

To celebrate this release, Altenew is giving away a $50 gift certificate to 6 lucky winners! Please leave a comment on the Altenew Card Blog and/or Altenew Scrapbook Blog by 6/24/2019 for a chance to win.

Prize 2

Please leave a comment here on my blog. Altenew will also draw a winner to receive a $15 gift certificate from the comments left on each designer’s blog on the blog hop list below.

All winners will be announced on the Altenew blogs on 6/27/2019.

Wednesday, June 12, 2019

Altenew June 2019 Stamp/Die/Stencil Release Blog Hop + Giveaway


Hi, everyone! Welcome!
I'm so honored to be a part of the blog hop for June 2019 Stamps/Dies/Stencil Release at Altenew. I hope you've come here from very talented Sandra's Blog, or you can start your hop from Altenew Card Blog.
Today, I'm going to share 4 cards featuring Forever in Love Stamp SetLeaf Clusters Stamp Set, and Frilly Frame Die from the New Release.

Before moving on, you can see the whole release HERE.

The Forever in Love Stamp Set has two beautiful rose bouquets with elegant sentiments in it. I really love this.

< Card 1>


I started by stamping the images on watercolor paper and water-colored them using Altenew's Watercolor Brush Markers. I then cut the images with Forever in Love Coordinating Die set.


For my first card, I stamped a sentiment from Forever in Love set onto A2 sized 110lb Neena White paper and heat embossed it with clear embossing powder. I then used Watercolor Stripes Cover Die to make a dry-embossed background on the surface. 


I adhered rose bouquet and leaves on the panel using foam tapes, and then I foam mounted the panel onto a white card base. I used Sparkling Clear Sequins Mix to embellish the card. 

< Card 2 >


For the second card, I used Cross Stitch Canvas Die to make a textured background for my flowers. The sentiment was chosen from Forever in Love set and heat embossed in white on gray cardstock. 


I then embellished it using Sparkling Clear Sequins Mix and Raspberry Sequins.
The main Watercolor Brush Marker Colors I used are Purple Wine, Sweet Leaf, Paper Bag, Crimson, Ruby Red, Lagoon, Warm Sunshine, Midnight Violet, Evening Gray, Limeade, and Moss.


Now I've finished two different cards by using just one stamp set :) 


☆☆☆

Solid shape stamps are my all-time favorites and here's a brand new gorgeous Leaf Clusters Stamp Set which has lots of design possibilities. 


< Card 3 >


I stamped Leaf Clusters Stamp Set on 80lb Neenah White paper using various dye inks from very light colors to dark colors, then I cut the panel with Cross Stitch Canvas Die to give a unique texture to it. A sentiment from the same stamp set was heat embossed in white on gray paper and foam mounted on the panel. 


< Card 4 >


The 4th card is very similar to the previous one, where I used Morning Frost, Evening Gray, Warm Sunshine, Autumn Blaze, Firebrick, Frost Glades and Evergreen


I used Frilly frame Die from the new release to give the panel a very unique texture.
For embellishment, I used Sparkling Clear Sequins Mix, 3mm Sparkling Clear Sequins and Gold Metallic Sequins.


That's it from me for today. Now, your next stop to hop along is my lovely friend Seeka's Thank you so much for visiting. 
Have a great day!

Marge

< Giveaway >

Prize 1:
To celebrate this release, Altenew is giving away a $50 gift certificate to 6 lucky winners! Please leave a comment on the Altenew Card Blog and/or Altenew Scrapbook Blog by 6/18/2019 for a chance to win.

Prize 2: 
Please leave a comment here on my post by 6/18/2019 for a chance to win a $20 gift certificate. Altenew will draw a winner from the comments left on each designer’s blog on the blog hop list below.

All winners will be announced on the Altenew blogs on 6/22/2019.

< Blog Hop List >

If you haven't hopped along with all the blogs yet, please visit the links below, get lots of inspiration, and just have fun!