Showing posts with label Simon Says Stamp. Show all posts

Tuesday, December 27, 2022

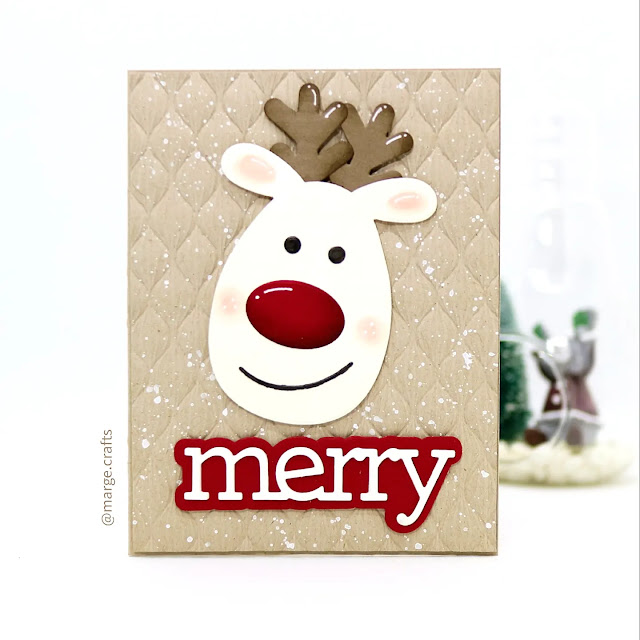
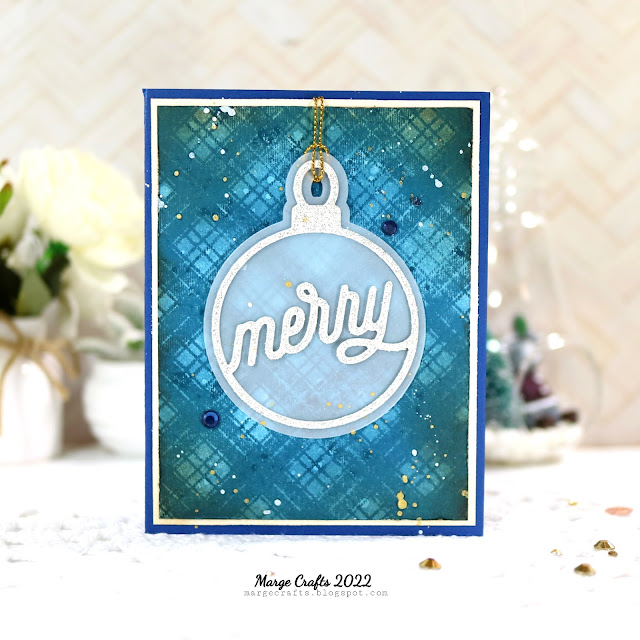
SSS Reindeer Cards


Hi, crafty friends!

It seems late but I'm going to share two Christmas cards which feature some recently released Simon Says Stamp products : Holiday Sparkle , Cozy Hugs, and Hugs Release. For each card, I made a background panel using Spun Glass Embossing Folder, which was splattered with some inks, and then I simply adhered Reindeer Parts Diecuts and Merry Word Diecuts on the panel. 


As Christmas was just around the corner, I needed to quickly make simple cards, and the Reindeer Parts Dies seemed perfect as a focal point for CAS design. FYI, I'm listing the supplies I used for each card below the photo. Hope it'll help. 


Supplies : Cream Cardstock, Neenah Desert Storm 100LB, Schoolhouse Red Cardstock, , Vellum, Gold Glitter Cardstock, Distress ink Ground Espresso for ink blending of edges, Prima Metallic Accents , white Pom PomsFoam tape, Bearly Art Glue, Copic Marker R20 & R30, White Gel pen


Supplies : Ivory CardstockNeenah Desert Storm 100LBSchoolhouse Red Cardstock, Neenah Texture Cardstock Brown, White gouache, White crdstock, Distress ink Ground Espresso, Copic Marker R20 & R30, W10,  White Gel pen


That's it for me for today. Thank you for stopping by! 
Happy New Year !

MARGE 


Thursday, December 1, 2022

SSS DieCember® 2022 Inspirations


Hi, friends!

It's been a while since my last post. I've been having recurred back & neck problems so it's been hard to sit on for crafting.  I'm trying to get healthy again doing some stretching and exercise.  


It's finally the release day for Simon Says Stamp DieCember® 2022 and I'm going to share several cards with you today.


These days, I enjoy ink blending on colored cardstock as it creates unique shades compared to inking of white paper. In this first card, I picked Cream cardstock and made a front window panel using Foliage Circle Die. I then colored foliage with Copic Markers. For sentiment, I stamped a sentiment from Greetings Mix 1 set with Versafine Clair Nocturne.   


For backdrop, I added Tattered Rose and Worn Lipstick to Cream cardstock piece using Large Blending Brushes. I used thin foam adehsive to adhere the front window and backdrop panels, then I added splatters of Metallic Gold and white gouache.  


My second card was made in a very similar way to the first one. For different color schemes, I added Peacock Feathers , Dried Marigold, and Spiced Marmalade onto Cream cardstock. For the sentiment, I simply adhered a strip from Reverse The Best Friends set.  


For embellishment, I adhered Glitter Drops Aqua and Blush

The next two cards are featuring Joy To You Cover Plate Die


 I made colorful strips with 0.75 inch width by trimming colored cardstocks : Lemon Chiffon, Cotton Candy, Green Apple, Peacock Teal, Schoolhouse Red, and Midnight Green. I then arranged them onto a sticky sheet to make a strip patten background. Next, I die cut it with Joy To You Cover Plate Die to made a fun window panel. 


Next, I added white Joy To You diecut on the back of striped panel to hold the strips in place and I adhered acetate sheet for shaker window. Then I applied foam adhesives around each letter cut, put sparkling gold seed beads and sequins into them, and closed the shaker with a piece of Fog Gray


For the second card, I ink blended  Joy To You diecut in blue and orange, then I added gold accents onto all borders. For this, I simply applied Versamark Ink onto the edges, and gold embossing powder and used a heat tool to melt them.  


I also added gold accents with Glitter Paper Copper diecuts and Glitter drops Butterscotch.  The backdrop pattern paper is from Craft Corsortium Tartan 6x6 paper pack. For the tags, I used Stitched Dress Up Tags, and I adhered letters I got from Joy To You diecutting, which I colored using Copic markers. 


I love this new velvet cardstock set so much! They were cut easily when diecutting and the smooth surface texture made the cards look special! In this first card below, I dry-embossed Denim Velvet Luxury Cardstock withGilded Ornamental Embossing Folder, die-cut the coordinating Ornamental frame from Glitter Paper Gold, and Silver and adhered them using glue and foam adhesive. Sentiment was also cut from gold glitter paper and vellum sheet using Rejoice Shadow Waffer Die. For more glitter accents, I embellished it with Glitter drops Ruby and Butterscotch.


I made a shaker for the second card. I fussy cut acetate film using the negative cut of Gilded Ornamental die as a cutting guide, then I adhered the film on the back of Gilded Ornamental diecut frame to compose a window. I placed various gold and red sequins on the center of Gilded Ornamental embbosed panel made with Navy Velvet Cardstock, then I placed window frame onto them using foam ahesives. 


The sentiment is from Believe Shadow Die. As a final touch, I added ribbon with gold accents and Glitter drops Butterscotch.


Now, the last card for today features Sweet Tooth Bears set.


I colored the images using my Copic Markers. I used my Scan N Cut machine to cut the images but you can use coordinating dies set. 
For backdrop panel of infinity shaker, I used Iconic Christmas Stencil to add light pink and teal colors.  For soft color palette, I mainly used Easter Confetti Mix to fill in the shaker pouch. 


That's it for me for today. 
Thank you for stopping by.
Happy DieCember® and Happy Crafting ! 

Marge

Friday, November 4, 2022

SSS Cozy Hugs Inspiration Cards


Hi, friends!

Recently I had had some break time from crafting for about three weeks and I got back to my desk a couple of days ago. I had fun with the new Cozy Hugs Release products from Simon Says Stamp and I made four cards to share with you. 


Card 1. Snowy Acorn House Card 


When I first saw this Acorn House Die, I came up with an image of cozy & warm cabin in the snowy winter scene. So I decided to make a winter cabin using the acorn.

2. Ink blend the diecuts using a blending brush and distress inks Ground Espresso and Tea Dye
3. Cut A2 size of Bristol paper, color the sky using distress inks Salvaged patina and Evergreen Bough , color the bottom using Snowfall and Banks stencil and various warm colors : Tattered Rose, Dried Marigold, Carved Pumpkin, and Picked Raspberry


4. Apply white aqoua molding paste over the background panel and Acorn House Diecuts through Snowfall and Banks stencil to make a snowy scene. 
5. Die cut Christmas Foliage out of white cardstock and colored the diecuts using the same distress inks.
6. Add splatters of white gouache and metallic gold ink all over the panel and diecuts. 
7. Apply some glue like Distress Collage Medium on the foliage diecuts and partial area of Acorn House , then coat them with Rock Candy Crystal Clear Glitter


8. Die cut Snowy Greetings out of white glitter cardstock and vellum paper. 
9. Now it's assembly time! Use glue and foam adhesives to compose all the pieces together. 
10. Embellish the card with 3mm clear sparkling sequins and finish it off. 


Card 2. Merry Words Card


I made a similar background using the Snowfall and Banks stencil and the same Distress inks. For a color variation, I used ivory cardstock instead of white paper, so the background color looks like mint or soft bluegreen and I love how the colors turned out. Because of the soft pastel colors of background, I wanted to create some fairy tale like mood. 


I die cut mini trees from Tim Holtz Mini Christmas Things Die set out of Fog cardstock and slightly added colors using Altenew Dye inks (Plum, Rubellite, Yellow Ochre, Lagoon)  and blending brushes. 


I die cut Merry Words Die out of white card stock and vellum paper and for the word 'merry' , I cut three layers and glued them for diemnsion. The sentiment is from Tiny Words Christmas stamp set. For embellishment, I used new glitter drops Leaf, which I adore so much these days. 


Card 3 & 4 : Merry Ornament Cards 

My last two cards feature Merry Ornament Dies from the Cozy Hugs Release


1. Apply distress inks Barn Door and Fired Brick to Canson Bristol paper, then used the same inks to stamp Tim Holtz Perfect Plaids
2. Trim the panel into 3.75 x 5 inch 
3. Distress all the edges using a distressing tool, add darker ink like Ground Espresso around the corners and edges. 


4.  Die cut Merry Ornament out of gold glitter and vellum paper. For dimensional look, cut two ~ three more pieces of merry frame out of white cardstock and glue them under the gold glitter diecuts. 
5. Adhere the ornament to the background and splatter with white and gold metallic inks all over the panel.


6. Mat the front with a little larger white cardstock which was also distressed on the edges and inkblended with Tea Dye. 
7. Adhere the front onto red card base. 
8. For embellishment, adhere some Ruby Glitter Drops around the ornament. 


And for my last card, I used distress ink Uncharted Mariner as the main color and Ground espresso and Tea Dye for more shades. 


For Merry Ornament, I used Diamond Glitter paper from the Stamp Market. 


The dark navy jewels are from Auto Vintage adhesive gems set by Scrapberrys. 


When I make vintage style cards - well I'm not good at those - , I enjoy to use combination of dark blues and brown, which gives some masculine and nautical mood. 


Well, I took lots of photos with various settings for my cards and it was so difficult what to choose! So I'm sharing two more photos here. 


Thank you for reading today's post! 
Have a great day :) 

MARGE


Monday, August 29, 2022

CAS leafy cards

 Hi, friends!

Today, I've got two clean and simple cards to share with you. 
The stamp & coordinating dies set I used was part of STAMPtember 2019 by Simon Says Stamp and The Stamp Market exclusive collaboration


I stamped the leafy images on white cardstock using several dye inks, then I die cut them with coordinating dies. 


For background, I trimmed watercolor paper into 4x5.25 inch size panel, then I watercolored the center lightly. I distressed all the borders using a distressing tool. 


After adding lots of splatters I let them dry. Next, I adhered leaves & florals using glue & foam adhesives.


I used soft color palette for my second card. Otherwise, a similar process was done.


 Thank you so much for stopping by. 
Have a great day !

Marge 

Sunday, August 28, 2022

SSS Cosmos Bloom Cards

 Hi, friends!

Today, I'm going to share two simply designed cards featuring Cosmos Bloom Die from Simon Says Stamp.


I started with die-cutting several Cosmos Blooms out of watercolor paper, then I lightly watercolored the diecuts using my Daniel Smith Watercolor paints : Moonglow, Phthalo Turquoise, and Phthalo Blue. For backgrounds, I colored lower half of watercolor paper using a wet-in-wet technique. For some streaky look, I held the panel stand obliquely and let the watered-down ink run down and let them dry. I added some splatters of darker ink. 


Next, I adhered colored cosmos blooms along the diagonal border of my panel. For a dimentional look, the bloom in the center was adhered with foam adhesives. 


 A sentiment from Sketched Flowers set was stamped and then I added a lot of white & metallic gold ink splatters all over the panel. As a finigh touch, light purple colored jewels were added. 


The second card was also finished in a similar way. It's a gratitude card this time. 


I chose sentiment from CZ 30 Days of Thankful and the blush jewels were used. I think the font of the sentiment goes very well with the simple design of this card. 


Watercoloring die-cuts is a very easy and fun technique and it extends your card designs as well. I hope you enjoyed my cards for today. 

 Thank you so much for stopping by.
Have a great day!

Marge