Showing posts with label Altenew. Show all posts

Wednesday, September 28, 2022

Watercolor Floral Cards for Altenew Inspiration Challenge


Hi, friends!

Today, I'm sharing a watercolor floral card to play along with September 2022 Inspiration Challenge going on over at Altenew Blog. 


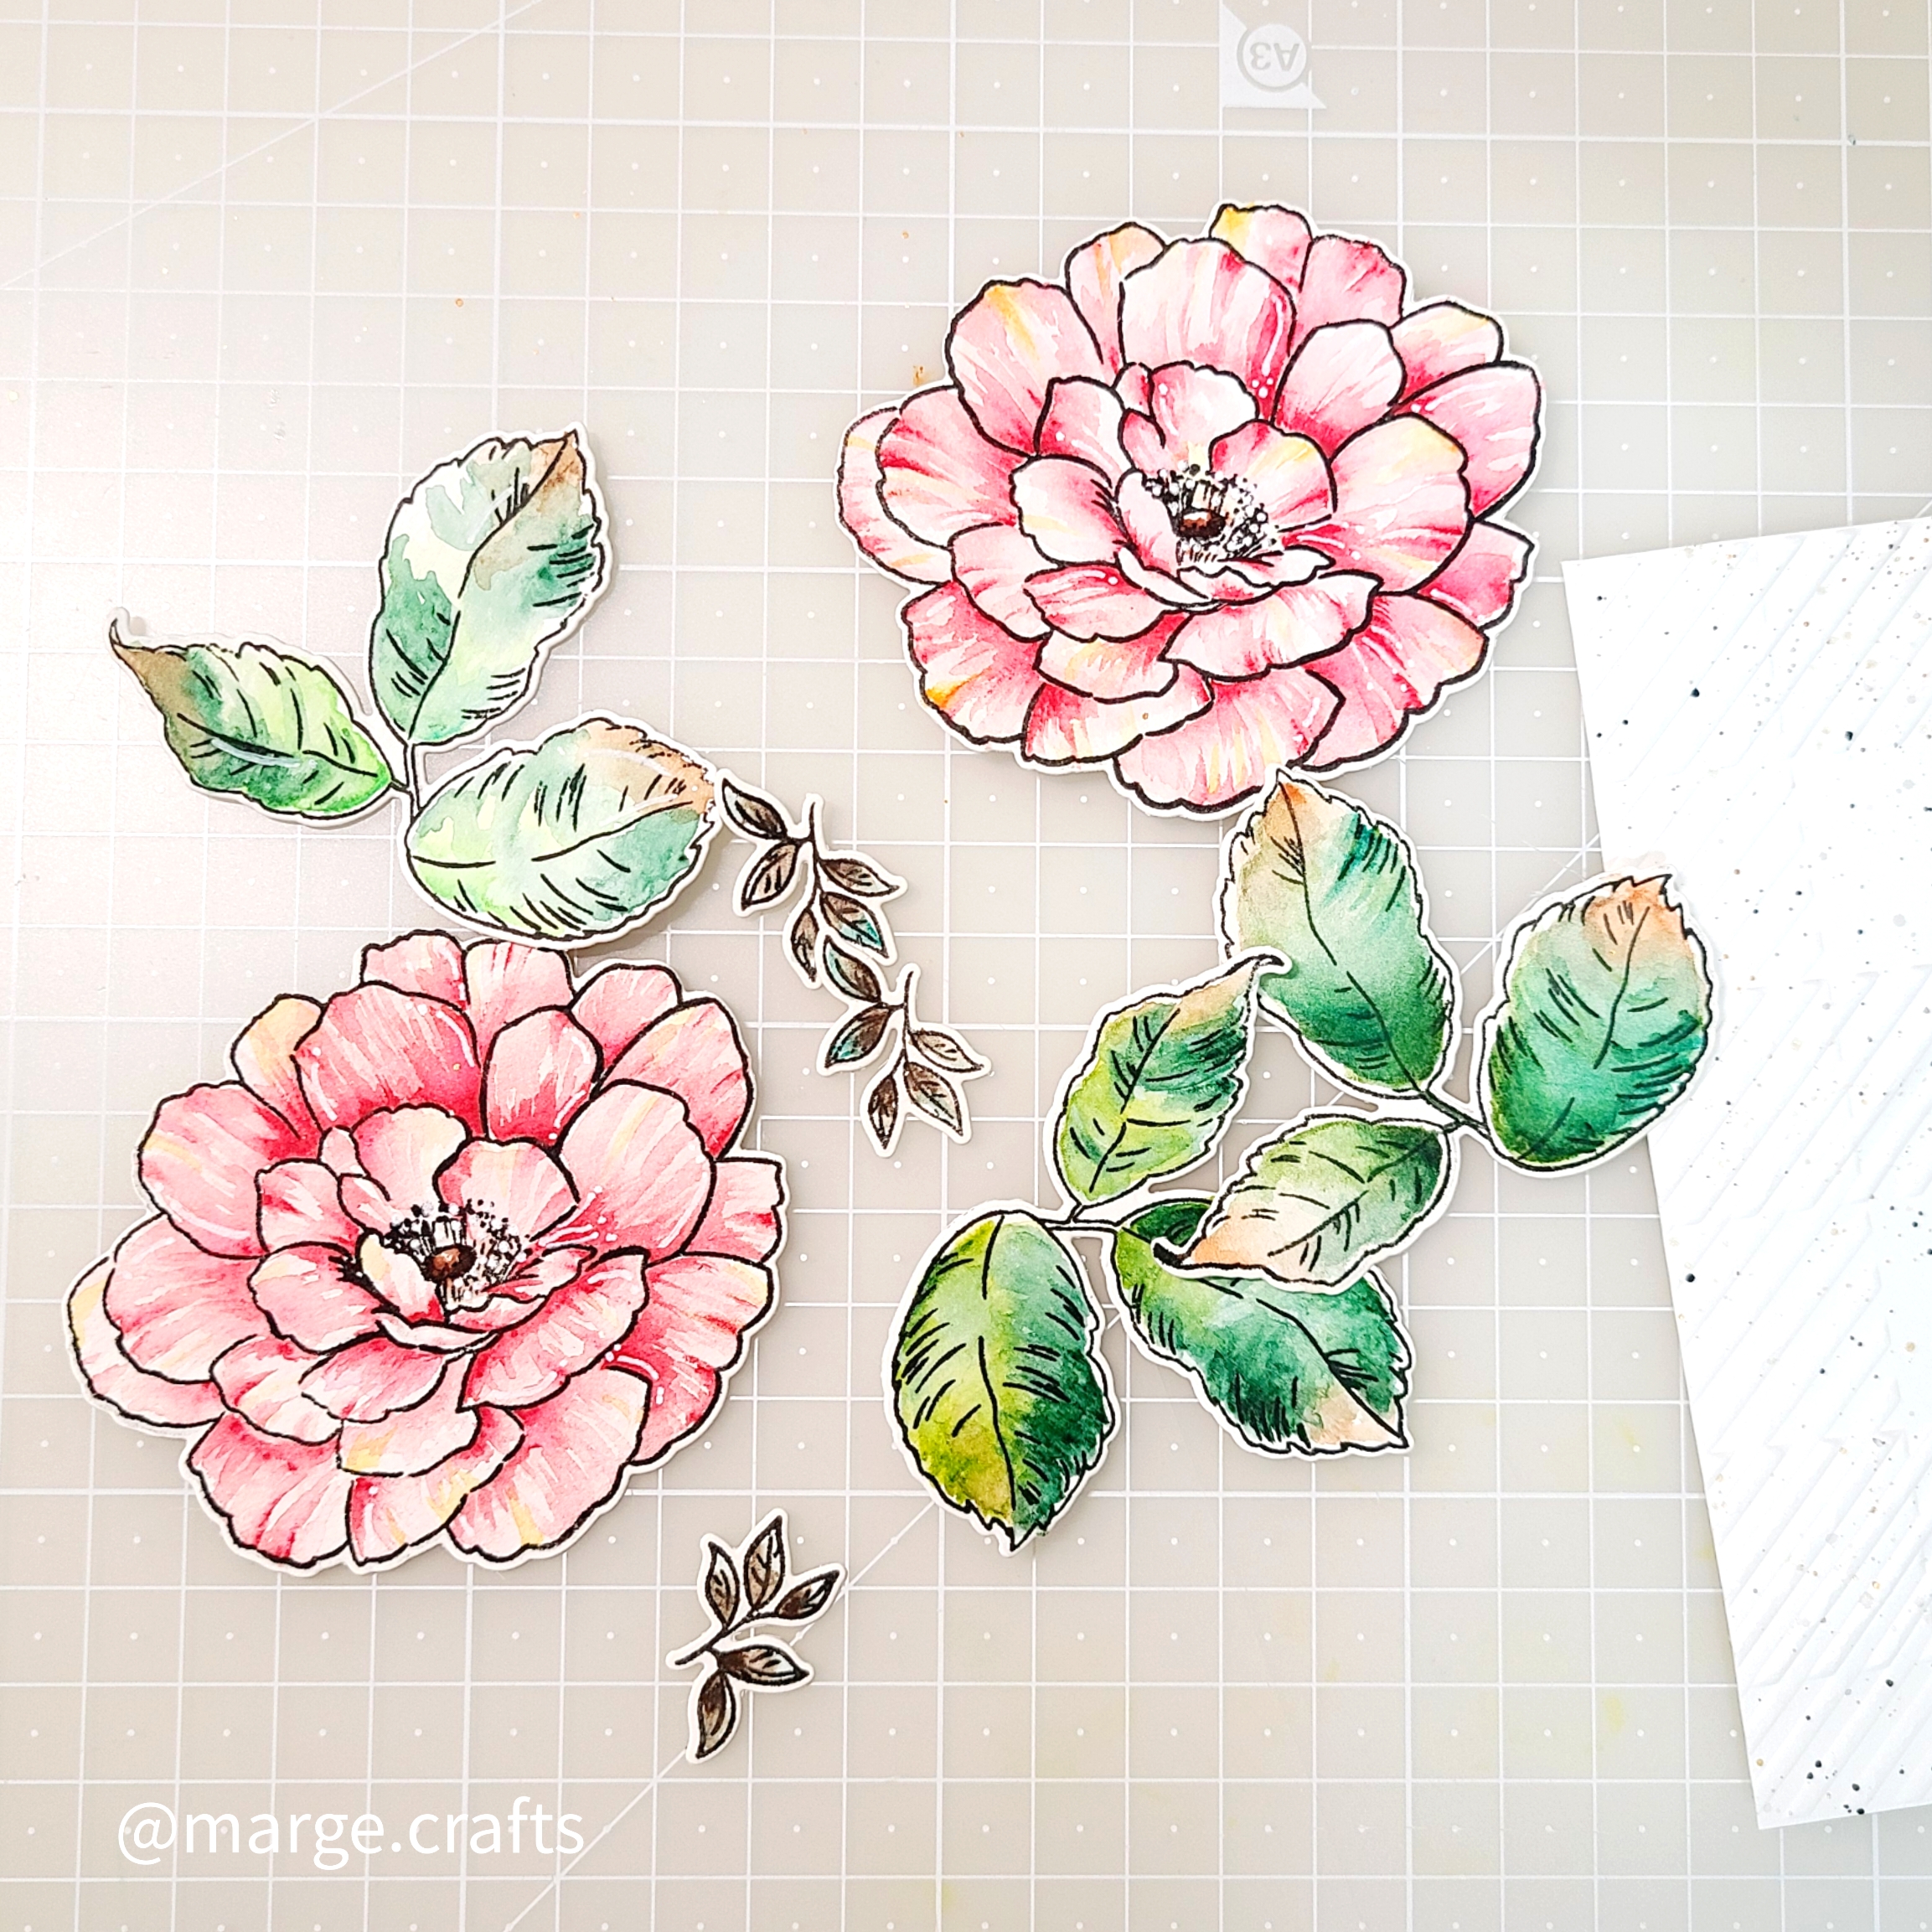
This beautiful color palette seemed just perfect for floral images, so I pulled out one of unused floral stamp sets from my stash, which is Beautiful Heart


I started by stamping the images on heavy-weight, cold-press watercolor paper with Versafine Onyx Black ink, then I colored them using Artists' Watercolor 24 Pan set. Main colors I used are Red Sunset and Green Meadows. I also used a watercolor brush marker Paper Bag to color the center of blossoms. After coloring was done I cut them with coordinating dies. 


Next, I prepared dry embossed panel using Buffalo Plaid 3D Embossing Folder, added some splatters, and then I adhered floral images using glue and foam adhesives.


Once again, I added lots of gold and white gouache splatters all over the card and let them dry. 


I heat embossed a sentiment from Across The Pond in gold on vellum paper, then I cut the piece into a fishtail shape tag, and glued it on the left top of the panel. With addition of some jewels, I finished off my card. 


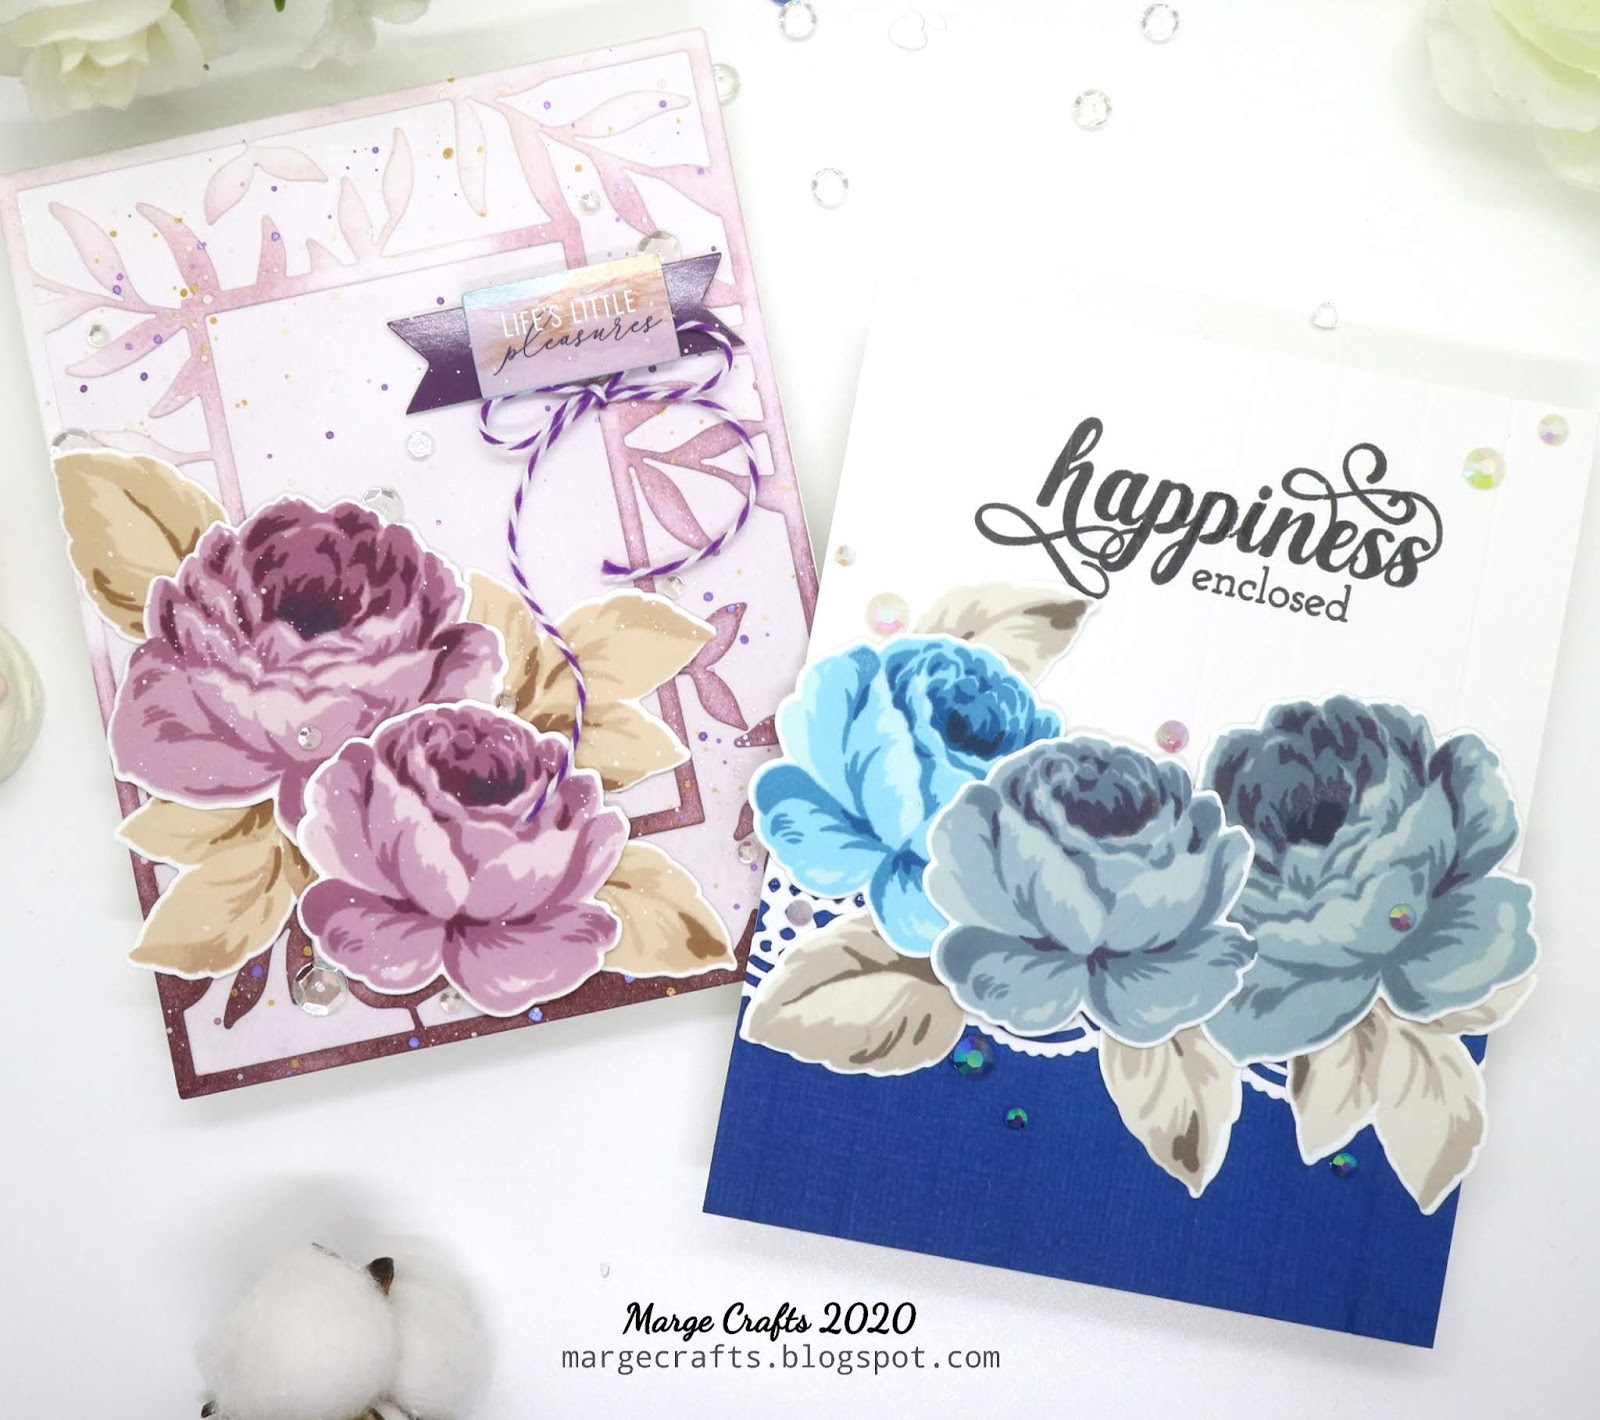
The second card wasn't planned at the beginning, but there were remnant floral pieces after finishing the first one, so I decided to make another one.


 These floral images were colored with Altenew 36 Pan Set  and you can see that the shades in the petals are light blue instead of yellow, which differs from the first card.


 Otherwise, I took a similar design to compare  the two different backdrop colors. Which one do you like more? 


Thank you for stopping by and reading this post. 
Hope you enjoyed it. Have a great day!

MARGE

Wednesday, September 14, 2022

Watercolor Ranunculus Cards using the Altenew's pan sets


Hi, friends!

Today, I've got two cards for you to enter an exciting challenge going on at Altenew's blog, which is called Pair-A-Flower Watercolor Contest . 


I'm a big fan of Altenew's watercolor products because they have beautiful colors and they work very well as watercolor mediums. For today's cards I used both the 36 & 24 pan sets as the colors are slightly different between the two sets.


Now it's time to choose stamp sets. Among the gorgeous floral stamp sets in my stash, I chose Ranunculus this time, which had been sleeping, never used over 5 years.  Although this is a layering stamp set, I chose not to use the layers but only outlines to watercolor the petals. 


I trimmed Hot press watercolor paper into A2 size, then I stamped the Ranunculus using Distress Ink Tea Dye. I placed the blooms and leaves overlapped using masking for one-layer look.


Once the images were stamped, I colored in them using 24 pan set. In order to give shades to the petals, I referred to the layer-stamped images printed on the stamp package. 


After coloring was done, I stamped sentiment on the top and added splatters of black, gold, and white inks. 


For my second card, I tried different color palette and for this I used 36 pan set as it has beautiful blue colors in it. 


Making process was quite similar with the first one. For stamping sentiment, I tried Versafine Claire Nocturne ink for the first time and I liked how it came out! Very saturated and crisp. 


Thank you so much for stopping by!
Have a great day !

MARGE


Tuesday, September 6, 2022

Watercolor doodling cards


Hi, friends!

Last weekend, I could finally open my new watercolor paint set which I had bought a month ago.  This Artisits' Watercolor 24 Pan Set from Altenew is so amazing! I shared a short video of opening the set, labeling each color and quick testing major colors  on my Instagram account. So if you're interested in it, please check it out. At first, I was just thinking of doodling video, but in the end, I made two cards from it, which I'm sharing here today. 


In the picture below, you can see that I opened all the half-pans and  adhered the sealing stickers onto a spring note to make a color chart. I think these sealing stickers are so useful because you don't need to make a color chart. The colors printed in the stickers well represent the real colors! I then also quickly made several watercolor testing panels. Without planning color schemes, I just colored each paint in the order they were placed on the palette. The paints were highly pigmented, colors were very pretty and bright, so it was such a pleasant time for me. I then set them aside and finished my watercolor doodling. 


The next day, when I look back into the panels on my desk, I decided to pick some of them and make cards. So I picked two, each with different color palette, and went with card designing. 

[ Card 1 ]


For this warm color palette card, I stamped Fairy Tale Rose using versamark ink and heat embossed it with white embossing powder. 


I trimmed the right side border using Creative Edges Lace Die and matted with similar colored pattern paper which I added more shades using some red & violet dye inks. 


I splattered with the same watercolor paints, and metallic gold & white inks as well. 
Sentiment strip was foam mounted on the bottom of the panel. For embellishment, I adhered heart shaped clear drops. 


I love how the elegant outlines of rosebloom in white go well with the gradient colored background. 


[ Card 2 ]

For the second card, I did the same process, except that I used Creative Edges Notebook Die  on the left border.


 The clean line notebook edges look so well with the cold color palette. For embellishment, I added clear round drops. 


With simple watercolor doodles, I could pull out two different designs, which was such a fun process! Which one caught your eyes ? 


Thank you for reading today's post.

Have a great day!


MARGE 

Monday, January 13, 2020

Floral Cards with Stamp Layering Techniques -Altenew Antique Roses

Hi, friends!
These days, I enjoy playing with unused craft products I purchased a while ago. When I have free time, I sit down in front of my crafty stash and think about what to choose to play with. Today, I chose some gorgeous floral stamps and new dye inks from Altenew.


I started by stamping Antique Roses on a sheet of 80lb Neenah White paper using dye inks mini cubes SugarPlums, Tranquility, Cool Summer NightCoffee Break, and Warm Gray. I then cut the blossoms and leaves using Antique Roses Coordinating Dies and set them aside.


For my first card, I diecut a Leaf Frame and gently colored it using the same SugarPlums inks and then I adhered it onto another slightly colored panel. I splattered with a couple of colors of Metallic Accents and let them dry. Once the panel was done, I arranged purple blossoms and brown leaves onto the left lower corner giving them dimensions using glue and foam tapes.


I was wondering what sentiments to add to the card, then I selected a sticker from Just A Little Lovely Embellishment Pack, which has the same color palette.  I foam mounted the sticker to the Right top corner and I added a ribbon made of purple baker's twine. 


For my second card, I followed the Pantone Color of the year 2020, which is Classic Blue.


 I cut a piece of blue cardstock, then I inked it using dark blue dye inks in my ink stash. The vertical lines were scored at 0.5cm intervals using a scoring board, and a sentiment from Crafty Greetings was stamped on top of the panel.  


In order to give some visual interest, I adhered a piece of Lace Die-cut on the upper part of the blue area. Now it's time to arrange blossoms and leaves.


I think I followed a little bit of classical layout on this card cause I wanted it with a more elegant look.


As a final step, I adhered the panel onto a card base and then I added some Jewels: Chunky Jewels Iridescent Clear Mix and Sugar Plum Jewels Mix.


Do you love stamp layering? Well....I always feel a little tricky when layering stamps, but once you've done it, the results are so great to see no matter how you stamped some pieces wrong. That's why I keep buying such stamps, lols.

Thank you for reading today's post. I hope you enjoyed it!

Have a great day!
Marge ♡♡♡

Thursday, January 9, 2020

Warm greeting card with a floral bouquet

Hi, everyone! Hope you are having a good time. Today I'm going to share a simple floral bouquet card that would fit for any occasion. 

The Breezy Bouquet stamp set from Altenew caught my eyes at first sight, and it reminded me of joyous moments when someone gave you such beautiful floral bouquets to celebrate something or of romantic memories with my hubby. Thanks to those happy memories, playing with this set was so pleasant.


I started by water-coloring Breezy Bouquet using Altenew artist watercolor brush markers and cut the images with coordinating dies
For the background, I masked off the right & bottom side of an A2 panel of Bristol paper, then I gently blended the empty space in coral and pink giving some gradation in a diagonal direction starting from Rt lower corner. I used Pink Pearl and Coral Bliss dye inks.


After blending was done, I added some splatters of water and metallic inks. When they dried, I foam mounted my colored bouquet on the panel, stamped a sentiment from Fancy Greetings, and added more splatters using white gouache. 


As a final touch, I adhered Cherry Blossom sequins around the bouquet and the card was finished. 

Thank you for reading this post. Have a great day!
Marge 

Sunday, January 5, 2020

Watercolor peonies card


It's been quite a while since I colored flowers last time, which is one of my favorite parts of crafting. 
As the holiday season was coming to an end, I wanted to feel some spring moods when I found this gorgeous Altenew's Precious Peony stamps in the store.  The contour lines of peonies were so elegant and sassy that I couldn't wait to color them! 


For a softer look, I stamped the images using Distress ink Tea Dye, which makes no-line look like effect on your painting. 
I used various watercolor mediums including Daniel Smith, Altenew paints, and Altenew watercolor markers. 


When coloring was done, I added splatters of white gouache, deep blue, and gold metallic ink


In turn, I chose a message from Across the Pond and stamped it on empty space. 


As a final touch, I embellished my card with some iridescent sequins and 3mm Sparkling Clear Sequins.


Well....I'm not fully satisfied with today's card, but at least I resumed watercoloring...yay!
 There's a very popular Korean saying which means "The beginning is already half done!"  How do you think about this?


I'm entering this card to the current January 2020 Inspiration Challenge going over at Altenew Blog.


 I'm happy that I enjoyed my weekend water-coloring and relaxing. Hope your day will be so, too. 
Thanks so much for reading this post.
Have a good day!

Marge♡

Monday, July 1, 2019

Altenew Build-A-Flower: Camellia Japonica Release Blog Hop + Giveaway


Hi, everyone!
It's the new Build-A-Flower release day from Altenew and I'm so excited to be a part of the blog hop. Hopefully, you've come from Kelly Janes's blog, if not then you can start your hop at the Altenew's Blog
Before reviewing my cards, here're the names and images of this month's new BAF sets.

6x8 stamp set and coordinating dies so you can easily create your projects. This is only available as a set and not as individual products.


Altenew also has a very special Build-A-Flower: Camellia Japonica and Ink Bundle to make it easier for you to start creating beautiful projects. Get the bundle and save 5%!


< Card 1 >


I stamped Camellia Japonica Set images on 80lb Neenah White paper using my mini-MISTI. I also took leaves from BAF: Rose Set. Then I cut the images with coordinating dies in the set. 


Next, I stamped small floral images in gray on a piece of white cardstock, and then I diecut it using Cross Stitch Canvas Die for a textured surface. I adhered my flowers and leaves onto the panel as shown in the pictures. 


I stamped the script "delightful" with Versafine black ink, heat embossed it with clear embossing powder, and then I fussy cut it by freehand. 


< Card 2>

The background was made with Peach Gold Washi Tape and Cross Stitch Canvas Die.


 The sentiment from Kind Words Stamp set


I adhered blossoms and leaves using glue & foam tapes. For embellishment, I added gold metallic sequins. 


What I love about the BAF series is that we don't have to color in the images. Just stamping layer by layer as the product's layering guide, and then you can get beautiful flowers on your hands. 


Now, I've finished two cards with one set. 
Which one is your favorite?


That's it for today. I hope you enjoyed my cards. Now, your next stop to hop along is Maria Willis. You don't want to miss the giveaway information and the whole blog hop list below.

Thank you so much!
Marge


Giveaway 1

Altenew is giving away a $30 gift certificate to 6 lucky winners! Please leave a comment on the Altenew Card Blog and/or Altenew Scrapbook Blog for a chance to win.

Giveaway 2

Please leave a comment here on this blog. Altenew will also draw a winner to receive a $15 gift certificate from the comments left on each designer’s blog on the blog hop list below. All winners will be announced on the Altenew blogs on 7/7/2019.

Blog Hop Order:

Altenew Card Blog
Norine Borys
Laurie Willison
Therese Calvird
Svitlana Shayevich
Virginia Lu
Altenew Scrapbook Blog
Jaycee Gaspar
Nenette S. Madero
Irina Fonina
Mindy Eggen
Kelly Griglione
Ashlea Cornell
Kelly Janes
Marge Yoon (You are Here)
Maria Willis
Maryam Perez
Isha Gupta
Zsoka Marko
Seeka
Michelle Murray


Additional info

Build-A-Flower Monthly Subscription

https://altenew.com/products/build-a-flower-monthly-subscription

This is a monthly subscription plan for our Build-A-Flower set. When signed up, you are guaranteed a spot in Altenew's monthly BAF releases and will receive a set each month - at a specially discounted price! ($35.00 →$29.99)