Saturday, April 28, 2018

[Simon Says Stamp] Limited Mothers Day 2018 Kit cards

Hi, there!
Hope you are having a wonderful weekend. 
Did you see the Limited Mothers Day 2018 Card kit from Simon Says Stamp? It is no longer available now, but I believe many of you already purchased it like I did -:)


The parcel arrived yesterday, so I quickly made a pair of cards using the supplies included in the kit with minimal use of other products. 


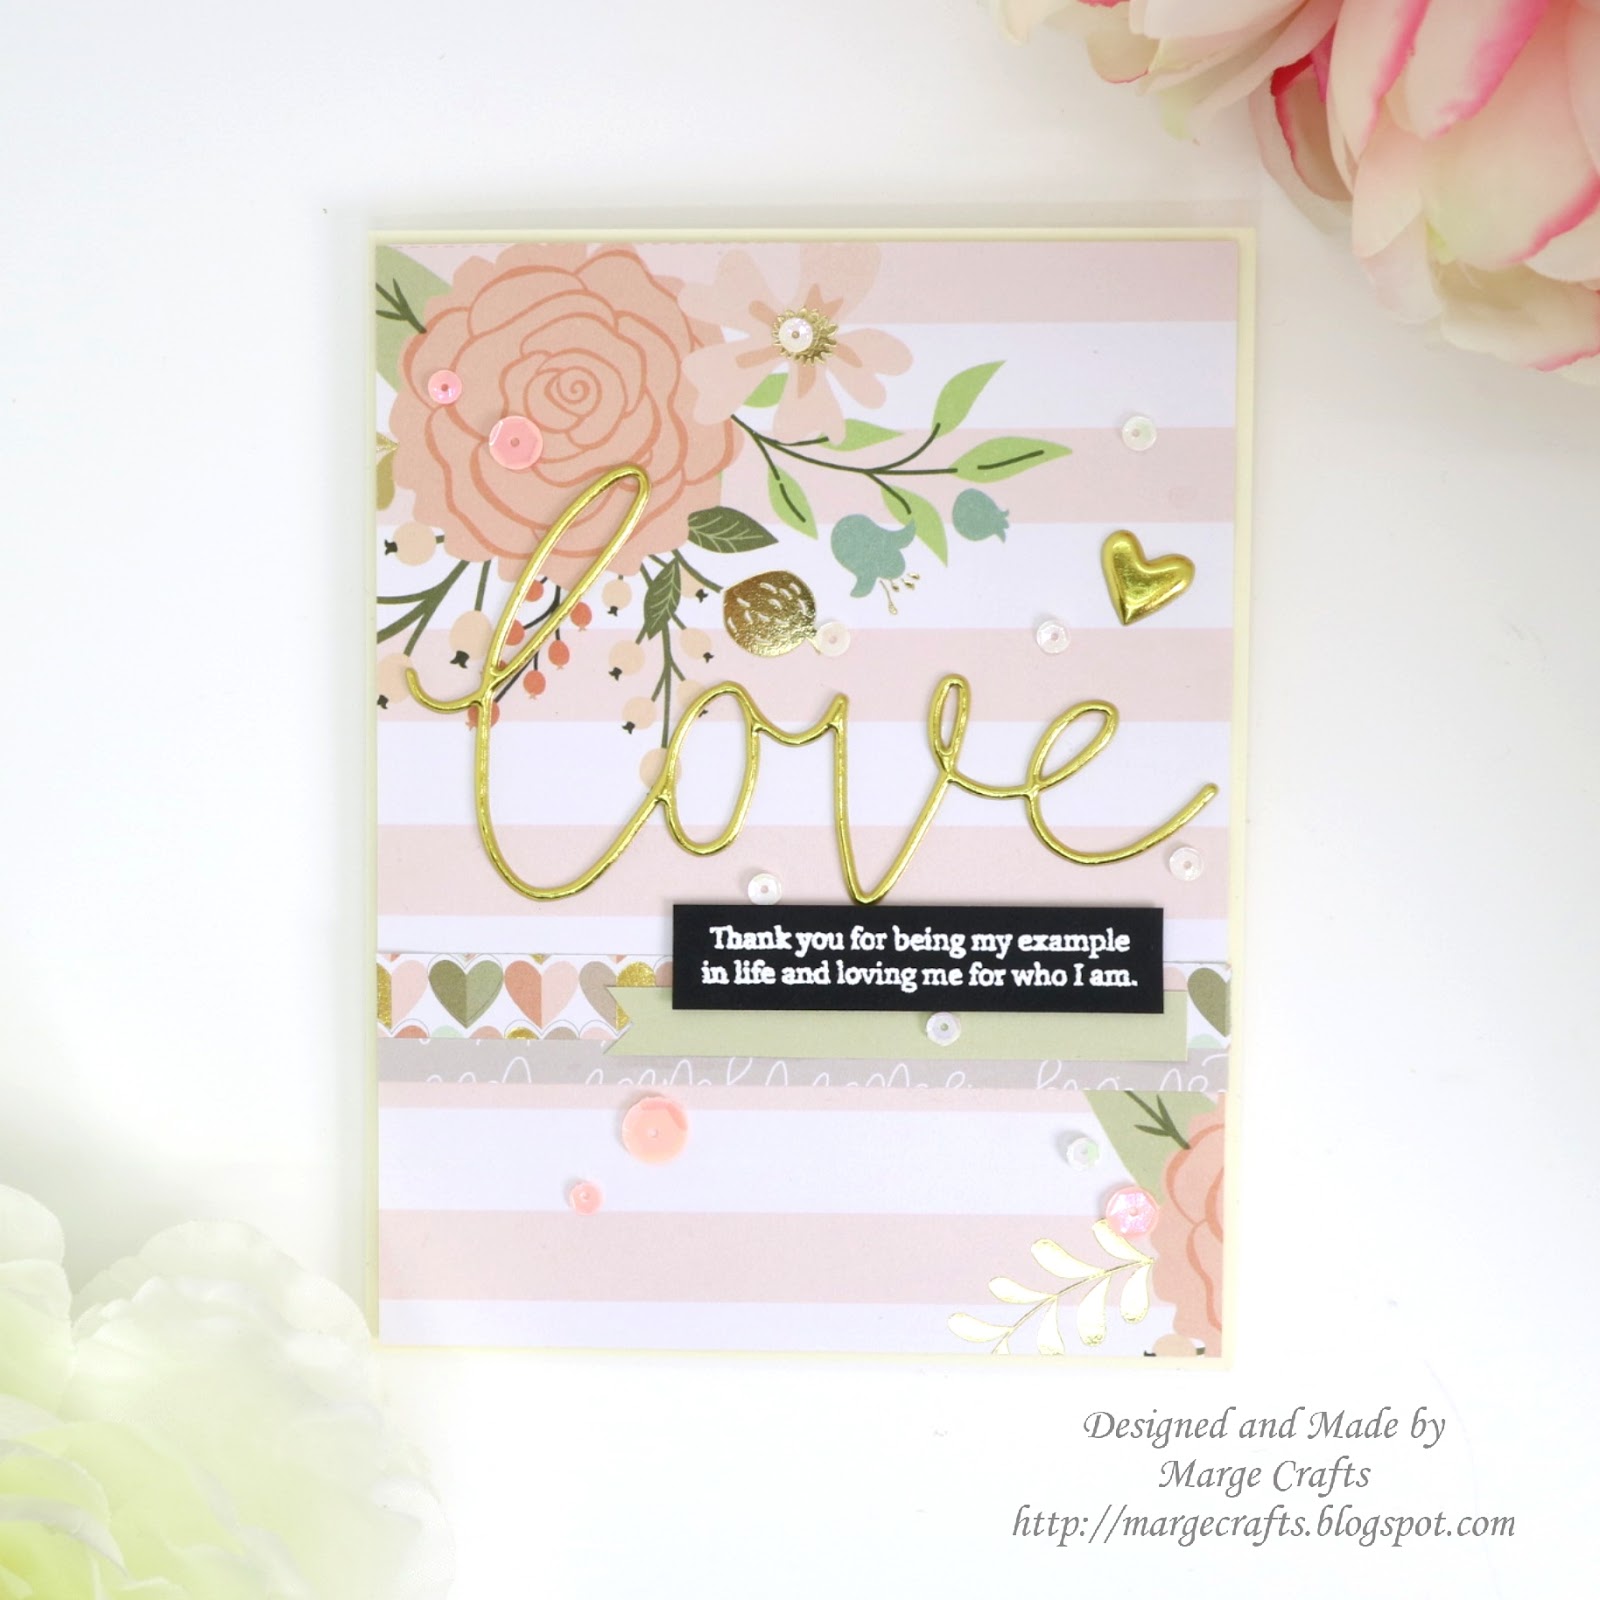
To begin the firsr card, I trimmed a sheet of floral pattern paper from My Mind's Eye Bliss 6x6 paper pad to a little bit smaller than A2 size. I also made 2 strips and a small fishtail tag from different papers in the same set. 
Next, I adhered the large puffy Love sticker in the upper center of the panel and then adhered the three paper pieces below it. 


Then I picked a sentiment from Mom's Clematis set and heat set it on black cardstock with white embossing powder, and then I foam mounted the sentiment strip on the card. 
I adhered the panel onto an A2 sized card base which I made with an Ivory cardstock that was included in the kit.
Finally I added Peaches and Cream Confetti Sequins here and there. 


For my second card, I used a butterfly patterned diecut from DCWV Paper Lace Mat, which was also a kit content as a window panel for shaker. I adhered a 4×4inch piece of Acetate film on the back of the diecut, then foam mounted the window directly onto a grey colored background panel, which is also from My Mind's Eye Bliss 6x6 paper pad, by using Darice foam double sided strips . 


I heat embossed a sentiment from Mom's Clematis set on a strip made with Dark Chocolate cardstock, then foam mounted it below the shaker.
All the sequins are Peaches and Cream Confetti Sequins .
Finally I adhered it onto an A2, ivory cardbase.


That's it for today. Thanks for reading this posr. I just wanted to share with you how to make cards using only card kit supplies with minimal extra products other than kit items. 
I hope you enjoyed it.


Have a nice day and enjoy your card kit :)

Hugs

Marge


Monday, April 23, 2018

[Altenew] Yellow Rose Card for spring

Hi, friends!
It's the start of a new week again.
Today, I'm sharing a yellow rose card with spring mood using Build A Flower Rose set by Altenew.
Since I'm not good at layered stamping, I wanted to do some practice and Build A Flower Rose set was my choice for it. 
Plus, who wouldn't be in love with the bold and fabulous design in this set?


I started my card by stamping solid images layer by layer on 80lb Neenah Solar paper using Alenew Dye Inks : Summer Afternoon set, Mango Smoothie, Dark Chocolate, Olive, Moss, Evergreen, Jet black.
Then I cut them all using the coordinating dies.

For smaller flowers I used copic makers in coloring them, and then I cut them using the coordinating die.


Next, I made a background panel using Cross Stitch Canvas Die from a white card stock. Then I assembled flowers and leaves on the panel using glue and foam tapes. Sentiment strip was also adhered using thin double sided foam tape. 
Finally, I adhered the panel onto A2 sized card base, and finished off the card by adding sequins. 


In this card, I used lots of bright colors simply because I wanted to feel like spring is just around by using the colors. But I'll definitely try some monochromatic colors too in my future cards. Any suggestions? 

FYI, Copic markers I used are :

B39, B06, B04, B02
V09, V06, V00
E33, E31, E41

Sequins : Pretty Pink Posh


Thanks for reading this post. Hope you enjoyed it. The big roses are so charming in both the way they look and the way I stamp multiple colors, I guess I will use this set more in the future:)

Hope your Monday will be as bright as the yellow roses!
Marge.


Friday, April 20, 2018

Altenew Celebrating Parents Card Drive Blog Hop + Giveaway


Hi, there!
I'm so honored to be joining the Altenew Blog Hop for Celebrating Parents Card Drive.
If you came from  Karin's blog, then you are on a right path, or you can just start your hops at Altenew Blog
Today we are showcasing Best Dad Stamp Set and I'm sharing two cards for it and one more card featuring another set.


Prior to getting started, I had planned to make two cards with different moods : one with a chalk board background for masculine mood and the other with white background for lovely mood for us daughters who give their cards to dads. 

To begin my first card, I trimmed a black card stock into 4.125×5.375 inch, heat embossed sentiments from Best Dad Stamp Set with white embossing powder, then blended white dye ink around the edges of panel. 


I stamped all the images of Best Dad Stamp Set  on a copic friendly paper, colored them with copic markers, and cut them all using the coordinating dies. Next, I adhered them onto the panel as shown below.


I foam mounted the panel onto a kraft card base, glued some clear sparkling sequins mix and 3mm clear sparkling sequins and finished off the card.


For my second card, I simply adhered stamped images onto a heavy weight white card base using foam tapes. 
I added gray shades under the images using copic markers, too. To maintain clean look, I added enamel dots and finished off the card.


Did you enjoy my two Dad's cards?
Actually this was my first trial of chalk board effect card, and I loved what it turned out. Hope you will like them, too. 


After I finished the two, I decided to make Mom's card as well, so I picked Penned Rose set from my Altenew stash.  I heat embossed blossoms and leaves on watercolor paper, then did watetcoloring using my Daniel Smith Watercolor inks, then I simply fussy cut the images. 


To compose a card, I also used Doodled Lace Cover Die,  Precious Moments, Simple Alpha Die Set from Altenew.  I finished off by adding various sequins here and there. 


Thank you so much for reading this. Now your next place to hop is beautiful Heidi's blog.


Celebrating Parents Card Drive

Let us join the Altenew's good cause which is sending cards for the elderly that lives in nursing homes or shelters to let them know they’re not forgotten. Please check out Celebrating Parents Card Drive for more details.

You can also support ALTENEW by purchasing the special items that are great for your Mother’s Day and Father’s Day projects :  Best Dad, Painted RosePenned RoseExtra Special, and Best Mom sets. 20% of the profits from these stamp sets until Father’s Day, June 17th, 2018, will be donated to the Food Bank of Central New York to support seniors in need.


Special Offer

Save 35% Off on the Best Dad Stamp & Die Bundle from 4/20/2018 until 4/23/2018 at 11:59 pm EDT. No coupon code needed to enjoy this deal.


Giveaway I

Altenew is giving away $50 gift certificates to THREE lucky winners. Be sure to leave comments by May 6th at 11:59 PM EDT for a chance to win! Winners will be chosen at random from the comments left on any of the blogs listed below and will be announced on the Altenew blog on Mother’s Day, May 13th, 2018.


Giveaway II

Please leave a comment here on my blog. One lucky winner will receive a $20 gift certificate to Altenew store. I'll announce the winner on May 2nd 2018. The winner will need to contact me within 1 week of winner announcement.
Blog Hop Order

Please visit all the blogs listed below. Hope you will enjoy your hops and get lots of inspiration. Have fun, my friends!


Love from Marge


Tuesday, April 17, 2018

[Simon Says Stamp] Clean and Simple Crocs cards using copic markers

Hi, friends !
Do you know Simon Says Stamp Picture Book Die collection? All dies in the Picture Book Collection are cute and have simple outlines so that you can easily compose the diecuts to make adorable images. I really love them and I had a fun time playing with Simon Says Stamp Picture Book Crocs Die, which is one of the March Best Days Collection . Today, I'm sharing three cards using the Crocs Die and other SSS products. 


I wanted try some new colors out of my comfort zone, so I tried denim blue, orange, and green.
To begin, I diecut Picture Book Crocs Die out of 120lb white cardstock, then I colored them using copic markers. I'll write down the copic marker numbers and products lists for each card below. 


Blue copic markers : B99,B97,B95,B93,B91,C7


Orange Copic markers : E09,YR09,YR07,YR04,Y38,YR02
Thanks die colors : E49, E47


Green Copic Markers : G28,G07,G14,YG13,YG03,YG01


For embellishment, I used various colors of enamel dots to maintain clean look.
That's it for today. Thanks for reading this post.
I tried some new colors and I love how they came out. 
Which one is your favorite ? :) 
Have a wonderful day, friends !

Marge


Monday, April 16, 2018

[Pretty Pink Posh] Watercolor Cherry Blossom cards

Hi, there!
Hope you are having a less stressful Monday!
For your relaxed day, I'm sharing two watercolor cards with you today.
I did watercoloring on the Cherry Blossom set from pretty pink posh.


To begin, I stamped blossoms and leaves on A2 sized watercolor paper with Versafine Onyx Black ink using masking technique. Then I watercolored them using Daniel Smith paints.


I added a semtiment from Encouraging Greetings set, then I embelished the card by adhering Pretty Pink Posh Jewels.


I did the same for the second card except that I made an upright design using Scallop Borders 2 Dies.


I love how jewels glowing on the watercolored images. 


Thanks for reading this post, friends!
Have a wonderful start of week!

Marge


Sunday, April 15, 2018

[Isabel Cristina] New Release - Magical Bella♡


Hi, friends !
It's a new release day of Isabel Cristina's Digital Stamp Etsy Shop , and the new product for this week is "Magical Bella" set.
If you don't know Isabel Cristina Stamps yet, it is a brand new digital stamps brand owned by a super talented card maker Isabel Cristina. She shows new products every week, and her images are so pretty and lovely. 
You could get a lot of inspirations from her IG account (@isabelcristinanl).

Today I'm showing two cards featuring the Magical Bella set. 
Here goes the first card.


I printed all the images on a Neena White 80lb paper, then cut them using my Scan N Cut machine, and then I colored the images using copic markers.
To make a background, I made an Ivory card base, masked the edges using masking tape, then I ink blended the front base using some of MFT dye inks (Kraft, Natural, In the Buff, Peach Bellini, and Coral Crush from top the bottom). I really loved this color combo look on the Ivory card base. Will surely use it again in my next cards :) 


Then I adhered the images on the card base using double sided foam adhesives. 
I also adhered Pretty Pink Posh Jewels to embellish the card.


The character Bella from Isabel Cristina Stamps is such a lovely girl, I adore her so much, which is why I applied to the Design Team where so many talented card makers all over the world are working together. 


Here's my second card. This time, I tried to make a room. So I gave it a little bit of dimension using some pop up technique. 


I'm sharing a couple of photos to show you the dimensions here.


I also added banner on the floor so that the receiver could also read some messages on the floor that I would write .


I made the outside of the card rather simple.
I added a tag on which the sentiment was printed prior and was cut using Stitched Tags Die from Pretty Pink Posh.. 
To give it a focal point, I added red twine and red enamel dots. 


Thanks for reading this post. Hope you've enjoyed it.
Have a wonderful day !
Marge


Friday, April 13, 2018

[Simon Says Stamp] New Release Fluttering By Collection- A Circle Butterfly Card


Hi, there !
Did you check the New April Release "Fluttering By " Collection from Simon Says Stamp? It's full of beautiful and fun products as always :)


I'm so happy to share a card featuring one of the Fluttering By stamps/dies which is  Flickering Butterfly Circle Dies set. I used inlay diecutting for this card. 


To begin, I diecut the  Flickering Butterfly Circle Dies  and Wonky Rectangles Dies on a piece of ultra thick copic friendly paper at the same time to make a background panel. Then, I adhered double-sided adhesives on the back of panel to stick  diecut pieces inside the cut space.

I did diecutting again using  Flickering Butterfly Circle Dies to make anoter set of positive diecuts, then I colored one set using copic markers.

Next, I positioned non-colored diecut pieces in the cut space first, then I glued colored pieces on top of them. For some butterflies, I added one more layer of colored diecuts so that they looked more dimensional. 


Large Hello sentiment is from CZ design Hello dies and CZ design Hello You stamps set, and was heat embossed using clear embossing powder. The small sentiment is from CZ design Simple Sentiments No.01 set and was heat embossed using white embossing powder. 

To embellish the card, I adhered a couple of butterfly diecuts around the sentiment and I also adhered sparkling clear sequins here and there. 


That's it for today.
Using this beautiful  Flickering Butterfly Circle Dies I made a clean look card.
Hope you will like it.
Thanks for visiting here and reading this post. 
Have a wonderful day !

Marge