Wednesday, May 30, 2018

Simon Says Stamp Wednesday Challenge : Anything Goes


Hi all and welcome to another week on the Simon Says Stamp Wednesday Challenge

This week the challenge is

Anything Goes


We are showcasing Doodlebug Products  this week. You don't have to use them to join in but if you have some we would love to see them used.

As always Simon Says Stamp will be giving away a $50 gift Voucher  for the Simon Says Stamp Store  to one randomly selected winner !


Here are my cards for challenge inspiration. 


The first card is featuring Sweet Summer 6×6 Paper Pad from Doodlebug.


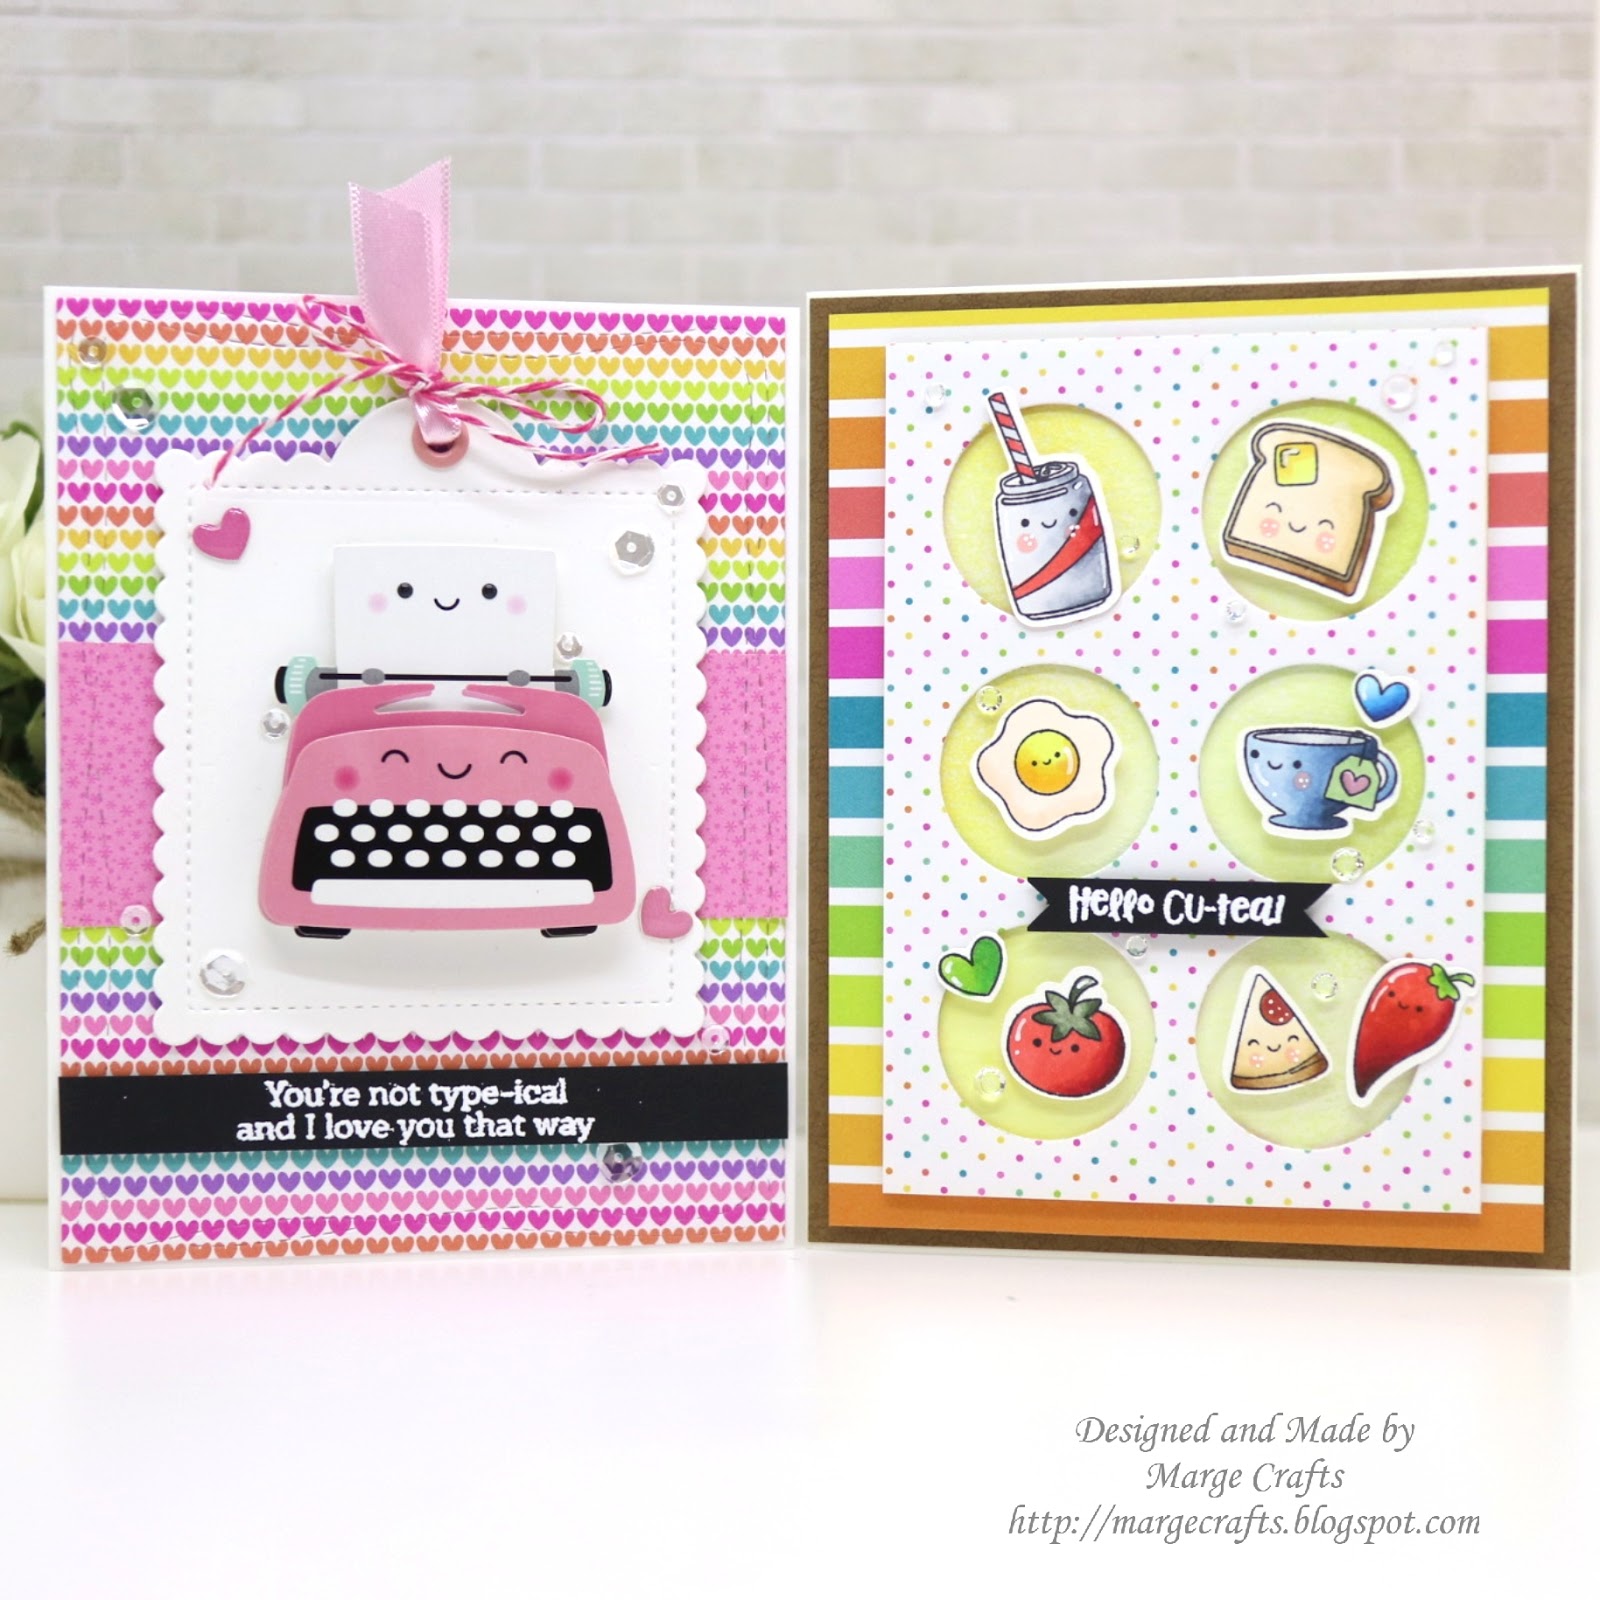
I started by stamping Breakfast Buddies and Foodie Friends Stamp sets from Simon Exclusives on  80lb Neenah White using Memento Tuxedo Black ink. I colored the images with copic markers then I cut them all using my Scan N Cut, or you could use Breakfast Buddies Coordinating Dies and Foodie Friends Coordinating Dies.


Next, I trimmed a piece of small dots pattern paper from Sweet Summer pad into 3.25×4.75 inch then I made 6 circles out of it using Repeating Circles Dies
I foam-mounted the circles panel on one of my previously colored panels, then I placed stamped images in the circles by using foam tapes
Sentiment from Breakfast Buddies was heat embossed on black card stock in white.


Next, I chose big rainbow- stripes pattern paper and tan mini palm trees pattern paper from the same Sweet Summer Pad, and trimmed them to be used as mats for my foodie panel. I used Simon Says Ivory Card Stock for card base. As a final embellishment, I added Pretty Pink Posh Sparkling Clear Jewels.


The second card is for featuring Fairy Tales 6x6 paper pad and Pen Pal Sticker from Doodlebug.
I diecut Scalloped Square Tag out of 110lb Neenah White Paper, then simply foam mounted Pen Pal Sticker on the tag. I also adhered two mini heart stickers that were included in the Pen Pal Sticker.


I chose two pattern papers from Fairy Tales 6x6 paper pad, cut them using Wonky Rectangle Dies. I further cut only mid part of pink dots paper then I adhered it on the rainbow hearts panel. Scallped tag was then put onto it with a little bit dimension using thin foam adhesives.

Sentiment was chose from Foodie Friends Stamp set and was heat embossed on black card stock in white. Then I cut it as a long strip and then I foam mounted it under the tag.


I embellished the tag and the card by adding more details including pink eyelet, ribbon, twine, and Sparkling Clear Sequins.

Which one is your favorite ? :) ♡


So now it's YOUR turn.  Happy Crafting !
You have until Wed  8am Ohio time. 1pm UK time, 2 pm CET to join in.
New creations only, please don't link projects published before the start of the challenge, Only 5 new creations will be eligible in the prize draw.


Do you use Instagram ?  If so please add  #ssswchallenge to your challenge entry uploads so we can see them on there too !


There are fabulous Giveaways and inspiration from fabulous designers on a daily basis over on the Simon Says Stamp Blog, if you haven't subscribed by email you may want to so you don't miss out.


Thank you so much for your stopping by and reading this. Have a wonderful day.


Marge ♡


Tuesday, May 29, 2018

[Pretty Pink Posh] Fuchsia floral cards

Hi, friends!
Today, I'm sharing a couple of cards I made with Flourishing Fuchsia Stamp set by Pretty Pink Posh.


To make this card, I stamped images on watercolor paper using distress ink Antique Linen, then I colored them with Daniel Smith Watercolor paints.


Then I added splatters of dark ink and white ink and I drew lines in brown using Copic Twinkling Marker Chocolate.


I diecut Lovely Script Die three times and glued them top on top. Top diecut was colored using copic markers : E49, E47, E44, E43.
"YOU'RE" was chosen from Bear Hugs stamp set.


Then I foam mounted the panel on Neenah Texture gray card base using foam tapes.


Finally I embellished the card using Metallic Rose Gold Jewels, Ivory Jewels, and 3mm Sparkling Clear Sequins.


The next card is the one that was shared on Pretty Pink Posh Blog for May Release Blog Hop.


You could get details about this card in the original post here. I'll summarize quick information on the supplies and technique I used.


Copic markers :

Blue : B39-B06-B04-B02-B00
Pink : RV25-RV23-RV21-RV10
Green : G14-YG03-YG01

Shaker sequins/jewels/ seed beads : Sparkling Clear JewelsIvory JewelsLemon Drop JewelsAmethyst JewelsWatermelon JewelsParty Time Mix sequins3mm Sparkling Clear sequinsGold shimmer Seed Beads, Lilac Seed Beads, and Daffodil Seed Beads.

I really love how the colors I chose look well together in shaker, flowers, and external embellishment.


Thank you for reading this post.
Happy Crafting!♡

Marge


Monday, May 28, 2018

My small giveaway winner

Hi, there!
Thank you all for your lovely comments to my post during last weekend. 

The lucky winners who will receive my card and SSS Glitter Cardsstocks are 

Cheryl Quilts 


Michelle( @icardink )

Please email me your mailing addresses 

Thank you
Have a nice day :)♡


Friday, May 25, 2018

[Altenew] Meeting Washi Tapes and Cross Stitch Cover Die + Giveaway

Hi, all!
Hope you are having a lovely start of new day.
Today, I'm sharing my cards featuring some of Altenew's recent products.
I was so impressed by the fabulous patterns of Altenew's Washi Tapes and interesting texture from Cross Stitch Canvas Die, so I decided to make cards by combining both of them.


For my first card, I covered a piece of white card stock with Altenew Monochrome Washi Tape, which is 4.5 inch wide being perfect for A2 size cards. Then I created fine stitch patterns on it by using Cross Stitch Canvas Die


I diecut a big "Thanks" out of  Simon Says Stamp Gold Glitter Card Stock with Altenew Script Words 2 Dies, and I made 2~3 more diecuts out of white card stock to make dimensional script. I put the diectus top on top by using Multi Medium Matte.

Sentiment "For always being there" was chosen from SSS Big Thanks Word Stamp set, heat embossed in white on Dark Chocolate Card Stock. I added the sentiment strip by using Darice Adhesive Foam Strip


Finally, I adhered the panel onto A2 sized side-folded card base that I made using 110 Neenah White Card Stock, and I embellished the card with Pretty Pink Posh Sparkling Clear Sequins Mix


I used the same panel made with  Altenew Monochrome Washi Tape and Cross Stitch Canvas Die in my second card. 


Here I added floral images from Coral Charm Set giving them some dimension with foam tapes. I used gray and silver as main colors to maintain clean monochrome look and light green as a focal point for visual interest.  


Next, I turned to different washi tape. For my third card, I made a panel with Altenew Floral Flurries Washi Tape and Cross Stitch Canvas Die


Sentiment :  Cross Stitch Flower Stamp Set heat embossed in white on black card stock


Here is my last card for today !
The panel was actually made a while ago when I prepared March Release Blog Hop Cards and I decided not to use this green panel then for some reasons.
Finally I'm happy that I made it into card. 


This panel was made by no-line watercoloring of Mega Succulent Stamp Set using my Daniel Smith Watercolor Paints . For more information about making this panel, please read here
I simply ran it through my Big Shot with  Cross Stitch Canvas Die


Sentiment :  Cross Stitch Flower Stamp Set heat embossed in white on black card stock


I really love how the stitch patterns add visually interesting texture on the somewhat plain watercolored panel. 
I also love how the dimensions of Script diecut and sentiment strip look on the card.


Now, I have finished four cards and surprisingly it didn't take much time to make these all. As I made more cards like these, I really fell in love with  Altenew's Washi Tapes and Cross Stitch Canvas Die. I'll definitely make more of them. 
I hope you have also enjoyed today's post. 


Thank you so much for visiting and reading this today.
Have a lovely day!
Happy Crafting.

Marge


** GIVEAWAY **

Please leave a comment to this post.
I'll pick a lucky winner and send one of the cards above together with my own assortment of Simon Says Stamp Glitter Card Stocks
The Announcement will be on May 28 9AM EDT.


Wednesday, May 23, 2018

Simon Says Stamp Wednewday Challenge : Use More than One Stamp


Hi all and welcome to another week on the Simon Says Stamp Wednesday Challenge

This week the challenge is

Use More Than One Stamp


We are showcasing Honey Bee Products this week. You don't have to use them to join in but if you have some we would love to see them used.

As always Simon Says Stamp will be giving away a $50 gift Voucher  for the Simon Says Stamp Store  to one randomly selected winner !


Here is my card for the challenge inspiration.


I stamped an image from Honey Bee Coffee Break set on 140lb Canson cold press watercolor paper using versafine onyx black ink, then I watercolored it using Daniel Smith Watercolor Paints : Burnt Umber, Permanent Alizarin Crimson, Sodalite Genuine, Phthalo Turquoise, and Sap Green.
Once watercoloring was done, I stamped a sentiment from Simon Says Stamp Coffe & Tea Set with versafine onyx black ink. Then I added  coffee beans from Altenew Coffee Love set using Altenew's dye ink Espresso.
Then I cut the panel using Wonky Rectangle Dies, foam mounted the panel on Neenah Desert Storm Card base. For embellishment, I adhered 4mm Espresso, 6mm Espresso, and 3mm Sparkling Clear Sequins


So now it's YOUR turn.  Happy Crafting !
You have until Wed  8am Ohio time. 1pm UK time, 2 pm CET to join in.
New creations only, please don't link projects published before the start of the challenge, Only 5 new creations will be eligible in the prize draw.


Do you use Instagram ?  If so please add  #ssswchallenge to your challenge entry uploads so we can see them on there too !


There are fabulous Giveaways and inspiration from fabulous designers on a daily basis over on the Simon Says Stamp Blog, if you haven't subscribed by email you may want to so you don't miss out.


Thank you so much for your stopping by and reading this. Have a wonderful day.


Marge

Monday, May 21, 2018

[Pretty Pink Posh] Sea Friends Card


Hi, Friends !
Today I'm sharing a summer themed card featuring Sea Friends Set from Pretty Pink Posh.


I stamped the images on Neenah White 80 Card stock with Memento Black ink, and colored them using copic markers. Next I cut them all using Sea Friends Coordinating Dies


I trimmed white card stock into 3.5 x 5.5 inch and ink blended the center using distress oxide ink Broken China. I adhered stamped images on the panel to create under the sea scene. I then foam mounted the panel onto Fog Gray Card base.  As a final embellishment, I adhered Sea Glass Jewels and White Pearl Jewels


You can get more creative inspiration from other design team members for this summer themed Sea Friends set on Pretty Pink Posh Blog.


Copic No :
B39-B06-B04-B02-B00 (whale)
C5-C3-C1-C0-C00-BG13 (Dolphin)
R85-R83-R81, V06-V04(seahorse)
Background ink : Distress oxide -Broken China


Thank you for reading this post.
Have a lovely day!
Happy Crafting .

Marge

Saturday, May 19, 2018

[Simon Says Stamp] May 2018 Card Kit Inspiration

Hi, there!
Hope you are having a lovely weekend.
Today, I'm sharing six cards I made using the May 2018 Card Kit by Simon Says Stamp.


Although June kit was recently released, I hope some of you are still interested in the May Kit inspiration ~~ :)

So here are my cards.
I tried to use only kit items as much as I could and refrained from using other dies,  stamps or embellishment.


Card No. 1


I used two pieces of pattern paper Let Your Heart Decide in the kit, red one as a thin strip and white one as a background panel. I made an A2 card base from Ivory card stock in the kit then I adhered pattern papers on it.  I added Heart diecut  using Darice adhesive foam strips, and Let Your Heart Decide puffy stickers as shown.


I really love how the Heart diecut gives clean look.
As a minimal embellishment, I added some Sparkling Clear Sequins from Pretty Pink Posh.


Card No.2


I prepared an A2 card base using Neenah white 110, then I adhered three pieces of kit papers in vertical direction. I simply adhered kit puffy stickers , giving them a little bit of dimension by using thin double sided foam tapes.
To make card 2 is so simple but I love the delightful mood that the mint colors and stickers gave to it.

Card No.3


Oh, this vertical stripes red paper is so famous, so I couldn't help but using it :)
I trimmed the red paper a little bit smaller than A2 size, then I adhered it onto a gray card base included in the kit.
I samped a sentiment from Take Heart Stamp set, and then foam mounted a Heart diecut below the sentiment.
Then I adhered Pinkfresh Studio's Epoxy Heart Stickers along the stripes. 


Card No.4


I chose a pink tone paper from the kit, then I cut it using Twisted Stitch Borders Dies. Next, I addedadded Heart diecut  using Darice adhesive foam strips, and Let Your Heart Decide puffy stickers. Sentiment is from Messages for Everyday Stamp set.


I foam mounted pink panel on an A2 sized  Ivory card stock in the kit, and then added a bow using May Arts Natural twine string. Finally I adhered the panel on a gray card base and then embellished it with Pretty Pink Posh Sparkling Clear Sequins.


Card No.5


I prepared an A2 panel out of Ivory card stock in the kit,  then I stamped floral images from Everything Together Stamp set on the top left and bottom right part of the panel, using Simon Says Hybrid inks which were also included in the kit. I used Melon for large yellow blossoms and Spring Rain for leaves and small mint blossom, and I also used other Hybrid inks : Watermelon, Hollyhock, Twirling Tutu, and Willow
I cut the panel using Wonky Rectangle Dies, then I stamped sentiment in the same stamp set, using versafine onyx black ink .
I foam mounted the panel on the pre-scored gray card base in the kit. No embellishment.


Card No.6


I stamped flowers and hummingbird from Take Heart Stamp set on watercolor paper, then did watercoloring followed by diecutting using Twisted Stitch Borders Dies . I stamped sentiments above the border, then I foam mounted the panel on a pattern paper, and rounded  May Arts Ivory string. I adhered the panel on cardbase made from Audrey Blue card stock in the kit, finished off the card by adding Pretty Pink Posh Sparkling Clear Sequins


Love the hummingbird♡


That's it for today.
Did you enjoy my cards?
Thank you for reading this post and I hope you will get some new inspiration for the May 2018 card kit.

Happy crafting!

Marge