Pages

Saturday, February 23, 2019

Card Inspirarion for St. Patrick's Day

Hi, friends!
Today, I'm sharing two cards for St. Patrick's day, featuring Best of Luck Stamp and Dies set that are 25% off for 3 days from now at Pretty Pink Posh Store
I colored the images of Best of Luck using copic markers and then cut them all with Best of Luck Coordinating Dies


I made a green shade pattern background using colored card stocks and Stacked Edges 2 Dies. Each diamond-shaped diecut was glued on a sheet of paper one by one, and then I cut the block into A2 size, then I drew white dot lines using a white gel pen. 


I cut a Scallop Diamond Tag out of white cardstock, and stamped a message from Best of Luck set, then I foam mounted the tag onto the background and adhered Best of Luck images using foam tapes and Glue Dots


To embellish the card, I used Shamrock, Spring Green, and Lemon Drop Jewels together with some ribbon and twine. 


Here's my second card for today. The background was colored using Distress Oxide Lucky Clover and Twisted Citron. The scalloped shaker frame was made of Celebrate Shaker Die.


After I assembled the shaker, I adhered my colored images and ShamrockSpring Green, and Lemon Drop Jewels for embellishment. The smiling cloud was from Rainy Days Stamp set


Here are Copic Markers I used to color green. 


That's it from me for today. I hope you enjoyed it. 
Don't miss the 25% sale for this set, which goes through February 25th ! 


Happy Weekend !


Wednesday, February 13, 2019

Pretty Pink Posh Celebrate Card

Hi, friends!
When and what do you celebrate for your beloved people? 
During this time of year in my country, we celebrate graduation from schools since new grade begins in March. 
Today, I'm sharing this fun celebration card featuring Celebrate Shaker Dies and Pinata Party Stamp, and Party Jewels Mix from Pretty Pink Posh.


I started by stamping Pinata Party and Cupcake Critters on Copic-friendly cardstock and colored the images using Copic Markers. I then cut them all using Pinata Party Coordinating Dies and Cupcake Critters Coordinating Dies.  
To make a background, I inked a piece of Bristol paper with Candied Apple, Abandoned Coral, Spice Marmalade, and Squeezed Lemonade. Then I splattered water on it. 


After my inked panel was dry, I diecut it using Celebrate Shaker Dies, adhered a piece of acetate film on the back of the negative diecut piece, then I glued Celebrate Shaker frame which had been cut from white card stock on the front. Next, I adhered foam tapes on the back of the panel around the shaker window. I then put Party Jewels Mix and colorful mixture of seed beads in it and then I covered it with a piece of ight yellow gingham pattern paper for shaker background. 


In turn, I adhered my shaker onto a card base, then I foam mounted colored images around the shaker. As a final embellishment, I added white gel pen details on the images, and 3mm Sparkling Clear Sequins


Thanks for reading this post. I hope you enjoyed it. 
Have a lovely day!

Marge

Tuesday, February 12, 2019

Pretty Pink Posh Birthday Card


Hi, friends! 
Today, I'm sharing a fun birthday card featuring Pinata Party Stamp set from Pretty Pink Posh.


I started by stamping Pinata Party and Cupcake Critters on Copic-friendly cardstock and colored the images using Copic Markers. I then cut them all using Pinata Party Coordinating Dies and Cupcake Critters Coordinating Dies.  


For the background, I trimmed a piece of yellow paper from Really Rainbow 6×6, then I adhered Scallop Frame with clouds on it using foam tapes. A sentiment from Pinata Party was stamped on the center through the frame. 


Next, I arranged my images on the background using Glue Dots and foam tapes. "Sending Love" came from Floral Hearts stamp set.  I added I then added glossy-look details using a white gel pen


I adhered my panel onto a card base, and I added sparkling embellishment using 3mm Sparkling Clear Sequins, Sparkling Clear Sequins Mix, and Ballerina Pink Sequins. For the pinata banners, I glued Party Jewels Mix


Thanks so much for reading this post. Have a festive day!
Marge


Monday, February 11, 2019

Pretty Pink Posh Valentine Crocus Flowers Card

Hi, friends! 

Today, I'm going to share a Valentine Crocus Flowers card with you. 
Since Valentine day is coming soon and we don't have enough time, I decided to go with a clean and simple design. 


 I stamped the images using Versafine Onyx Black ink and water-colored them with some watercolor paints (I used Altenew Watercolor Brush markers and Daniel Smith watercolor paints).  And then I cut them all using Crocus Flowers Coordinating Dies.


Next, I trimmed a piece of Heavy Weight Watercolor paper into A2 size, then I cut out a heart window using the Scallop Hearts Dies. I cut it on another card stock again to make a double layer frame.  I further colored ground on the Rt lower corner of the panel and splattered with dark inks. 


In order to stamp a sentiment inside the heart frame, I placed a card base on mini MISTI, then I stamped Love sentiment on it with the guidance of the heart window frame. After the inks are dry, I foam mounted panel on the card base, then I adhered Crocus Flowers on it using glue dots and foam tapes. 


As a final embellishment, I adhered Ballerina Pink Sequins here and there and finished off my card.


Thank you so much for reading this post. Hope you enjoyed it. 
Have a wonderful day! 

Marge

Sunday, February 10, 2019

Simon Says Stamp February 2019 Card Kit Inspiration


Hi, friends!
I'm so thrilled to share some cards with you before Valentine comes. I'm featuring Simon Says Stamp February 2019 Card Kit, today. I made six cards using the kit items as main supplies and here they are.


< Card 1 > 


I stamped a sentiment from Love Always Set with Versamark Onyx black ink, then I make it and stamped music notes from the same set over the panel using Distress Oxide Iced Spruce. Next, I cut a small heart window out of the panel using Layered Hearts Dies. I also diecut it using Postage Stamp Edge Dies


I colored the floral bouquet in a heart shape on another piece of card stock using my Copic markers, then I adhered the piece on the back of the front panel using foam tapes. In turn, I adhered my panel onto a card base made of Neenah Texture Red and finished it off by adding some sequins and hearts. 


< Card 2 >


I stamped and watercolored flowers from Love Always Set, then I adhered the piece on the back of the heart window panel which I made using Quilted Hearts Background Stamp, Doll Pink Ink, Wonky Rectangles Dies, and Ornate Love Dies.   


In order to add sentiments, I heat embossed a sentiment block from Love Always Set in gold on vellum paper using Gold Embossing Powder. I then cut the vellum piece using Nested Banner Dies


Finally, I adhered my panel onto a card base made of Neenah Texture Red, then I adhered Metallic Gole Jewels for embellishment. 


< Card 3 >

After I finished two cards, I wanted to use some pattern papers included in the kit. 
So I glued two layers of paper and cut out a window on the center using Wonky Rectangles Dies. I stamped messages on an Ivory card base with the guidance of rectangle window, then I foam mounted my panel onto the base. 


I then added a piece of Picket Fence and a blossom on the bottom of the window. 
To make the blossom, I first stamped the image from Love Always Set on a piece of watercolor paper using Abandoned Coral and Peeled Paint, then I brushed it with my water brush so it would look like a watercolored flower. After it was dry, I cut it freehand. For embellishment, I added a string of Ivory Twine and some Nuvo drops ( Autumn Red and Bubblegum Blush)


< Card 4 >

Here's another card where I used elegant pattern paper from the kit again. 


As soon as I saw this beautiful floral patterns, I thought it would go well with the elegant Wrought Iron Dies. So I made a shaker where I used vellum paper instead of clear acetate film so that it would look more natural and softer. 


To assemble the shaker, I laid a piece of vellum on my desk, then I adhered Wrought Iron Diecut piece first, and the other pieces next to the shaker window as shown in pictures. The right floral paper was cut again using Wavy Scallop Stitches Dies and then I adhered Schoolhouse Red cardstock on the back of the right wing so that the whole panel would complete A2 size. 


I turned my panel upside down, adhered foam tapes around the shaker, put sequins in it, covered it with a piece of cardstock, and then I finally put my shaker onto a card base. In turn, I added a sentiment block that was chosen from Beautiful Flowers, and finally, I added Autumn Red and White Nuvo Drops. 


< Card 5 > 

I had originally planned to make four cards using the kit, but when I finished four, I thought I wanted to make more with simple designs this time.  So here are Card 5 and 6. 


I stamped flowers from Love Always Set on the top and bottom part of the panel using Ground Espresso. I didn't do masking, I just stamped images right next to the others. 
I stamped a sentiment from Sketched Flowers set on the center, then I diecut my panel using Wonky Rectangles Dies.  Card base was made from Dark Chocolate Cardstock.


I wish I had added some jewels or sequins, but I forgot to do so and now I think this CAS version would look ok by itself :) 


< Card 6 > 

Here's the last card for today. I simply stamped flowers in a circle shape using  Distress Oxide Iced Spruce, then I colored the images lightly using my Copic Markers. The panel was cut using  Wonky Rectangles Dies


I foam mounted a happy birthday message from Sketched Flowers set, which was matted with gray cardstock on the center of the panel. Card base was made of Neenah Texture Gray. Finally, I adhered some blue sequins. 
The Copic numbers I used are BG75-BG72-BG70 for blue, R14-R12-R000 for coral, YG95-YG93-YG91-BG90 for leaves. 


That's it from me for today. I hope you enjoyed this.
Thank for stopping by and have a great Sunday! 
Marge


Friday, February 8, 2019

Pinata Cupcake Birthday Card

Hi, friends! 
Today, I'm going to share a Pinata cupcakes birthday card featuring Pinata Party Stamp set from Pretty Pink Posh, which is full of so many fun Pinata items. 


I started by stamping Pinata Party on 80lb Neenah White paper then I colored the images using my Copic Markers. I then cut them all using Pinata Party Coordinating Dies


To make a background, I chose two main colors of Distress Oxide inks, which are Lucky Clover and Twisted Citron. I ink blended the two colors first, then I needed some neutralizing shade so I used Cracked Pistachio to blend out contrast between Clover and Citron. I then added a little bit of teal shade with Peacock Feathers. I love how it turns out beautiful teal when you add Peacock Feathers to the green colored panel.  To give some interest, I splattered with water and gold metallic ink. 


Next, I stamped a sentiment on the right bottom of my panel using Versafine Onyx Black, then I stamped various fun embellishments using different dye inks. 
I then adhered my Pinata Party images as shown in the picture. To make a garland, I simply adhered twine string on the back of flags using Micro Glue Dots


After I foam mounted the panel onto a card base,  I adhered jewels here and there as a final embellishment. I also added a little more details using a white gel pen


Thank you so much for reading this post. I hope you enjoyed it. 
Have a nice day!

Marge♡

Wednesday, February 6, 2019

Simon Says Stamp Wednesday Challenge : Interactive Card

wed-newchallenge-header

Hi all and welcome to another week on the Simon Says Stamp Wednesday Challenge
Thank you for joining us for the Anything Goes Challenge and we hope you will all join us again this week too.
This week the challenge is to make an

Interactive Card 

we would like to have some fun with this, maybe shaker cards, a hidden element, slider, pop up, there are lots of different techniques we could use!
We are showcasing Lawn Fawn Products this week. You don't have to use them to join in but if you have some we would love to see them used
The lovely folks over at Simon Says Stamp are generously giving away a FABULOUS $50 voucher to shop at the  Simon Says Stamp Store! All you have to do is take out your crafty supplies, make something following this week’s prompt, and add a link in the Inlinkz at the bottom of this post! You can join 5 times so you could have 5 chances to win! How AWESOME is that!! All winners are chosen randomly, so everyone has an equal chance to win! Woo Hoo!! Good Luck to everyone! The Design Team is looking forward to seeing your crafty makes and will pop around to visit you ASAP!
50dollar_voucher_600px

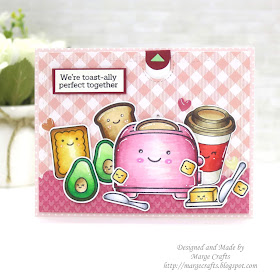
Here's my card for the challenge inspiration. I used Let's Toast Pull Tab Add-On Dies from Lawn Fawn.


This Pull Tab Dies set looked so much fun! Just pull the tab and a piece of bread will come out of toaster :) 
All the images from Let's Toast Stamp set, and Coffee and Tea Stamp set were colored with Copic Markers and cut using Coordinating Dies. 


 For background panel, I cut Lawn Fawn papers with Wonky Rectangles Dies and Wavy Scallop Stitches Dies from Simon Says Stamp. 
In order to keep the main color theme of lovely pink, I used Copic Markers R89-R85-R83-R81-RV000 for the toaster. 


I also added a little heart on the tab so it would come out when pulling the tab upward.
Once you're done with coloring and choosing panel, the rest is too simple. Just use the Let's Toast Pull Tab Add-On Dies and then assemble the die-cuts. 


After I put my images together, I searched my stash to find perfect sentiment for the scene and found this wonderful sentiment from Breakfast Buddies Stamp set


Here's the full list of supplies I used with links to online store product page. Hope you will enjoy them, too. 


 < Supplies List >


Misc: Itsy Bitsy Polka Dots Pastels 6x6 paper from MFT, Rainbow Hearts Shape Sprinkles from Doodlebug design, Darice Foam Square Adhesive, Foam Adhesive Roll, Mini Glue Dots.
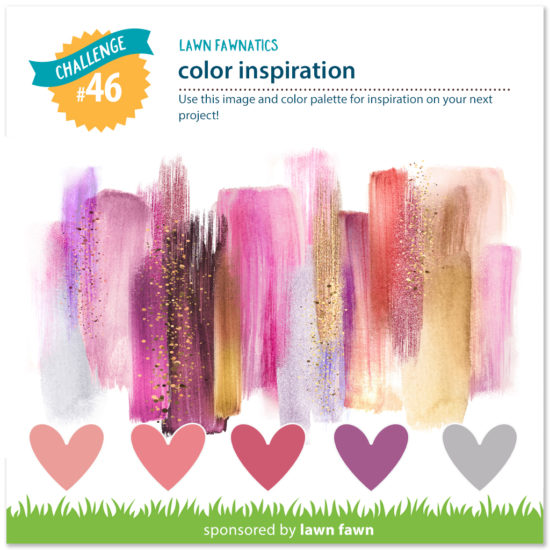
I'm also entering this card to the current LawnFawnatics Challenge #46.


I'm so sorry to let you know that I'm leaving the Simon Says Stamp Wednesday Challenge Design Team, so sadly this card is my last one for the challenge. It was such a painful decision and it did take a few months to make.  I'm facing important changes in my life, really need to focus on my job (and my career), family and health. Among my health issues, ocular hypertension especially worries me and leads me to decide to change my lifestyles in general... 

I've really enjoyed the design team works and I've got so much love from all of you and the team. It was my dream come true to work in the Simon Design Team. I'm so grateful for the opportunity you offered, your love and kindness, Heidi, Susan, Stephanie, and Simon Team. Even though I'm stepping down, I'll always think of you and will love Simon Says Stamp forever :) 
It's been a great honor to be on the same team with you, Wednesday Challenge Sisters! Each of you has your own unique style and you've always given me lots of new inspiration. Thank you for all the warm comments and kindness you've shown to me. I was so happy to call you sisters. 

Thank you and blessings to you all.
Hugs.


Do you use Instagram?  If so please add  #ssswchallenge to your challenge entry uploads so we can see them on there too!


There are fabulous Giveaways and inspiration from fabulous designers on a daily basis over on the Simon Says Stamp Blog, if you haven't subscribed by email you may want to so you don't miss out.


You have until Wed  8am Ohio time. 1pm UK time, 2 pm CET to join in.

New creations only, please don’t link projects published before the start of the challenge, Only 5 new creations will be eligible in the prize draw.

Thank you so much for your stopping by and reading this. Have a wonderful day.
Marge ♡