Pages

Wednesday, September 20, 2017

MFT card design superstar challenge - Coloring category

Hello, I'm sharing a card to enter into MFT card design superstar challenge - coloring category.

Here is my card.
I wanted to make a cozy autumn scene, and stamps from My Favorite Things are just perfect to make a scene. 


I first made an A2 sized panel with white card stock, then stamped images using masking when needed, then colored with copic markers.
Then I trimmed the panel, and then mounted on a white card base, using 1mm thickness foam tapes. 


The stamps I used are :


Thank you for reading this.
I hope you enjoyed it. 


Tuesday, September 19, 2017

MFT card design superstar, Clean and Simple genius

Hello, there!
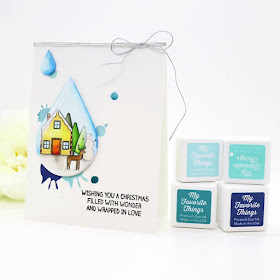
Today I'm sharing a care for entry into the My Favorite Things card design superstar challenge clean and simple genius category .
Please click the image below to link to the challenge site. 


I wanted to make a winter scene in a drop as well as water drop effects on my card.
First I die cut a big water drop, stamped images using masking on it, then colored with copic markers. To give it a glassy look, I gave shades using copic markers and then brushed a little amount of white gesso on it. 


Then I prepared an A2 sized card base, then stamped water drop images from Abstract Art set using dye inks from MFT. 
The large waterdrop diecut piece was mounted using fun foam. 
I also added a smaller waterdrop die cut above the larger one to express drops falling down.


As a final touch, I added a silver metalic twin ribbon. 
To make it Clean and Simple, I let most of the spaces empty white, and made a one layer card. 


Supplies I used are all from My Favorite Things
Stamps : Abstract Art, Winter Wonderland
(I couldn't find the product infos about the stamps I used at MFTstamps.com) 

Hope you enjoyed this. 
Thank you
Marge Y. 


Saturday, September 16, 2017

STAMPtember & Pretty Pink Posh Collaboration - Damask greetings


Hello, friends!
I'm back with Pretty Pink Posh STAMPtember release, which is called "Damask Greetings" .


Do you see those elegant Damask patterns? 
I really fell in love with them. You can make any patterns with this stamp set all year long.


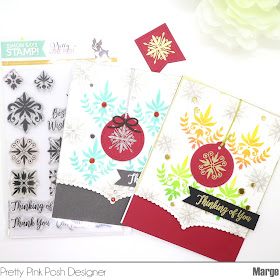
So here are my cards using Damask Greetings Stamp Set.


To begin the first card, I stamped images using color dye inks on a white card stock, and cut the panel using our Scallop Borders 2.  I gave ombre effect on each image using multi colored inks. 
Then, I inked the edges with versamark ink, and heat set them with gold embossing powder. 
To give a focal point to the card, I made an ornament from a red card stock using Mini Tags Die, then I stamped one damask image and heat set it using gold embossing powder.  Finally I added some Metallic Gold Confetti Mix sequins


My second card is basically quite similar with the first one, I gave some differences in colors and embellishment. Here I added a ribbon die cut from our Twine and Bows Die, and Metallic Silver Confetti Mix as final touch. 


Thanks for reading this.
I hope you enjoyed my cards. 
Major supplies are linked in the text.

However, I think other cards by our team are really gorgeous.
I was just amazed again and again by their cards, so I would like to recommend you to visit our Pretty Pink Posh Blog or Simon Says Stamp Blog  to get more creative inspirations from them. 


Happy weekend to all !
Marge


Sunday, September 3, 2017

Guest designing at AAA card challenge #98 - Creatures Great of Small


Hello there!
Today I have a happy news.
I'm guest desining for the new AAA cards challenge #98
I'm so honored to be a part in the challenge and thankful to the AAA team for giving me this opportunity.

The new theme is "Creatures Great of Small".
(Click the image below)


So here is my card.
In this card, CAS definition is minimal layer, minimal embelishment, and large open space.


I stamped the images from Woodland Critters by Pretty Pink Posh, using masking techniques when needed. 
Then I colored them, adhered the panel to a kraft card base.
Since I wanted to express mood of Autumn,  I used an Ivory card stock for base copic friendly paper instead of white, so the background looks a little bit yello,  and I love the overall tone down colors I used here.


I used copic markers as below :

 Bear : E41, E42, E43, E44
 Deer : YR27, YR24, YR21
 Bunny : W00, W0, W1 // C00, C0, C1
 Squarrel : E33, E35, E37, E41
 Ground : E81, E51, etc
Butterflies : BG96, YG93, YR31
Mushrooms : YG95, G99, E51, E52
E19, E07 (for red)

Thanks for reading this post
I hope you enjoyed it.
Please come and play with AAA cards challenge #98.
Seeing your works would be a great pleasure to me.

Marge.


Friday, September 1, 2017

The Ton September Challenge Guest Design- Mood Board

Hello, there !
I'm honored to be guest designing in the new September Challenge at The Ton's Blog, as I was the winner at The Ton's July challenge.

This month's theme is a Mood Board seen below. Click the images to link back to the challenge post.


What a gorgeous autumn mood board full of inspirations!


When I first saw these photos, I couldn't decide what theme to choose, each was so fabulous, so I once considered making a mood board card again like what I made in July's challenge. 
But how boring it is to make another same card! 

So, here is my take on the challenge.
I wanted my card to be full if autumn mood with harvest of blessings.


First, I cut a 4×5.25 inch panel from natural card stock paper, and stamped mini solid images from Autumn Foliage Stamps set
I gave some gradation in each image using 2~3 inks of similar colors, which is also called "multi color stamping" technique. I really love how it came out, so these days I often use this technique in my cards :) 


Next, I stamped a big image from Thankful Cornucopia Stamps set on a white copic friendly paper, then colored it using copic markers. 
Main colors I used are as below;

Cornucopia : E31, E33, E35, E37, E59, E79
Largest Pumpkin : YR21, YR24, YR27
Small pumpkins : YR09, YR07, YR04 / YR18, YR68


When copic coloring was done, I die cut it using Jumbo Fishtail Banner dies, rounded a string and tied a bow. 
On a woodgrain brown card base, I foam mounted the background panel, then foam mounted the fishtail banner with main image on it. Then I added some gold heat embossed sentiment tag. Final touch was adding some sequins. 


That's it. 
Thanks for reading this post.
I hope you enjoyed it.

Thank you for inviting me as a guest designer for the September Challenge. 
I'm very honored to be with you, The Ton Team!


Marge.


Dot.B September Release

Hello and welcome to my blog.
Today I'm sharing two cards featuring a brand new digital stamps.
My friend Eun Ji Jung started a digi stamp brand Dot.B on her Etsy shop.

Eun Ji is really super talented in her illustration and all kinds of coloring media. She's also a very active cardmaker working as a designer in The Ton Stamps. 

 Today is Dot.B's September release day and I'm showcasing "Boo Party" set which is a halloween stamps set.
So here is my first card.


I colored the images using copic makers and fussy cut them all. For the background, I sponged some white pigment dye ink and  distress inks (faded jeans, chipped sappire, seedless preserves, and peacok feathers) on a navy cardstock panel and cut it into 4×5.25 inch using a stitched rectangle die.


Then I stamped a sentiment from a Happy Haunting by lawnfawn and heat embossed it with white embossing powder. I then added splatters of diluted white gesso to express starry night. 
I also made a picket fense diecut from pretty pink posh, which I colored with a distress ink - brushed corduroy.

Then I adhered images here and there and final touch was putting some navy 4mm sequins.

Look at those spooky, cuty children in halloween costumes !
I especially love dracular costume, pumpkin mask and gost's dress here :) 

☆TIP☆
Applying white pigment ink on the background before sponging darker colors makes misty effect to the night sky. I love how it came out :) 


Now, here goes my second card.
In this, I wanted to express children who are are going out for candy treats at halloween night. 


First, I prepared a 4×5.25 inch panel of watercolor paper, distressed it uisng dried marigold, squeezed lemonade, and pumice stone from bottom to top. 
Then I splattered some heidi swapp spray and let it dry.
I then hand-drew spider webs on both upper corners using a waterproof pen, then stamped a sentiment from Trick or Treat by lawnfawn  using versafine onyx black ink.


I colored Dot.B "Boo Party" images using copic colors and fussy cut them, very similar process with the first card. Then I put the images onto the panel.


Here, the children are all holding  jack O lanterns, they seem to be ready for trick or treat ! :)


Thanks for reading this post.
I hope you enjoyed it!
Marge.


Eun Ji's blog :


Dot.B Etsy Shop :